Managing hybrid teams (in-office and remote colleagues) without centralized document storage will quickly lead to problems!
If a team member can’t find the right file when they need it, they may waste time searching through emails or have to wait until the right person comes online.
Sharing files as email attachments can lead to multiple versions of the same document and concerns about data security. Without real-time co-authoring, data can be overwritten by different authors with no means to recover the original file.
How SharePoint Simplifies Document Management
Hybrid teams need a secure, simple place to store all project files and manage access to documents at any time. A SharePoint document library can solve these problems and improve collaboration for hybrid teams.
Keep reading to learn more about SharePoint libraries and key features such as metadata and views.
What is a SharePoint Document Library?
A SharePoint document library is like a large folder for creating and storing files in a central location. It displays a list of files and folders along with information or metadata about each file, such as ‘created by.’
A library is added to sites created in SharePoint Online and SharePoint 2019 by default. Users can add more libraries or different types of libraries based on their needs.
The library inherits the permissions of the parent site. While it is possible to set permissions at the library or file level, this is not recommended.
Essential Features of a SharePoint Document Library
Unlike the document folder on your desktop, a SharePoint document library offers numerous collaborative features to project teams, including:
- Co-editing documents in real-time.
- Version control.
- Sharing files using links.
- Adding workflows for review processes.
A SharePoint document library is a significant piece of your project toolkit, helping to create a single source of truth for files and project deliverables.

Types of SharePoint Libraries
There are four main types of libraries in SharePoint.
- Document library – This is the default library described above. Use this library to store project documents in one place for your team.
- Picture library – A way to store pictures, displayed as thumbnails for easy sorting. If you are working on a marketing or image-heavy project, this type of library may be useful for project assets.
- Site assets library – This library is also added by default and used to store everything on a SharePoint site.
- Site pages library – Similar to the above, this library houses all of the pages on a site. No documents are stored in this library.
Libraries can also exist in a portal area (used by the whole company) and in large-scale document or record centers.
You can store numerous file types in a SharePoint document library. If in doubt, Microsoft Support has created a list of file types and extensions that cannot be added to a SharePoint On-Premises document library.
Storage Limitations
SharePoint document libraries offer generous file storage:
- 30 million files and folders.
- SharePoint 2013: 250 MB file limit. This can be increased to an absolute maximum of 2 GB by your IT team.
- SharePoint 2016: 2 GB file limit with a maximum of 10 GB.
- SharePoint Online and SharePoint 2019: 15 GB file limit.
For SharePoint Online, the 15 GB limit only applies to files uploaded via drag and drop. Files uploaded using the ‘upload’ button are limited to 2 GB.
For more details on file storage, character limitations, attachments, version history, and file naming, see this article from the Microsoft Community. There are also a few other document storage options available you should be aware of.
OneDrive for Business
OneDrive for Business is a single document library within a SharePoint site collection. It’s ideal for creating and storing your work documents.
While OneDrive for Business shares some functionality with a SharePoint library, you can’t assign metadata to files or add workflows.
Sharing documents for collaboration from OneDrive is also tricky due to permissions. If you do need to share a file, it’s best to move the document to the team site. A SharePoint document library is a better choice for project teams and company-wide files.
Microsoft Teams
Microsoft Teams is a collaboration platform with chat, video conferencing, and file management. It runs on the Microsoft 365 Groups framework, and each team includes a SharePoint Online site with a document library.
When you add a Public Channel to a Team, a folder for that channel is also added to the SharePoint document library. Private Channels have a separate lightweight SharePoint site collection with a separate document library.
Microsoft is bringing the full power and experience of document management in SharePoint and Teams integration. As such, the Files Tab in a Team site now closely resembles the document view in SharePoint Online.
Now that you know a little more about SharePoint document libraries, let’s take a look at four ways to improve collaboration with this toolset.
How to Use a SharePoint Document Library for Remote Projects
A SharePoint document library simplifies file management for remote teams by improving organization, collaboration, and accessibility.
Metadata, filters, views, co-authoring, and version control ensure documents stay structured and easy to find. Learn how to use these features to enhance project efficiency.
1. Metadata
Like most people, I use folders to organize documents on my local desktop. The folders make sense to me, and I can easily find what I need when I need it.
Trying to replicate a similar structure in a SharePoint document library is impossible, as everyone will have their own way of managing folders.
It’s too easy to file something away in the wrong place or to lose files in subfolders.
Metadata provides a simpler way to manage files without relying on folders and subfolders.
Default and Custom Metadata in SharePoint
In SharePoint, metadata is represented as a column, such as, file name, modified date, and file type. Using this information, team members can filter and sort the library to find what they need.
Beyond default columns, you can also add custom metadata that is more relevant to your project.
Suggestions include:
- Document type, for example, meeting minutes.
- Status, such as approved.
- Department, useful for cross-functional projects.
It really depends on your project. To get the most from metadata, it’s important to agree on what’s needed before the project starts and to make sure your team is following this process.
Adding New Columns
To add new columns, click the library ribbon and select ‘Create Column.’
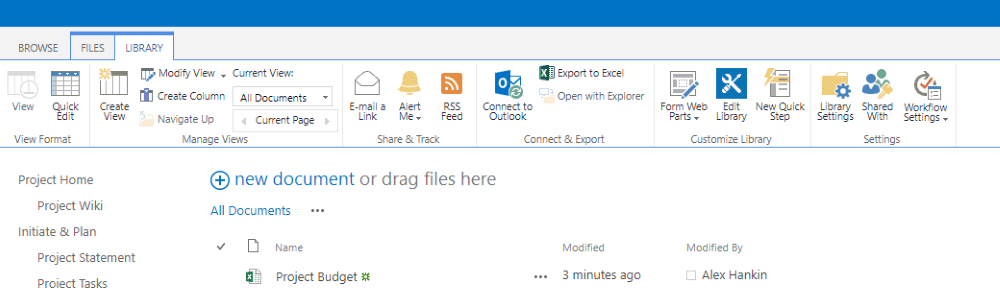
Fill out the form with the relevant details. In this example, I’ve added a new column, ‘Project Phase’ to the library.
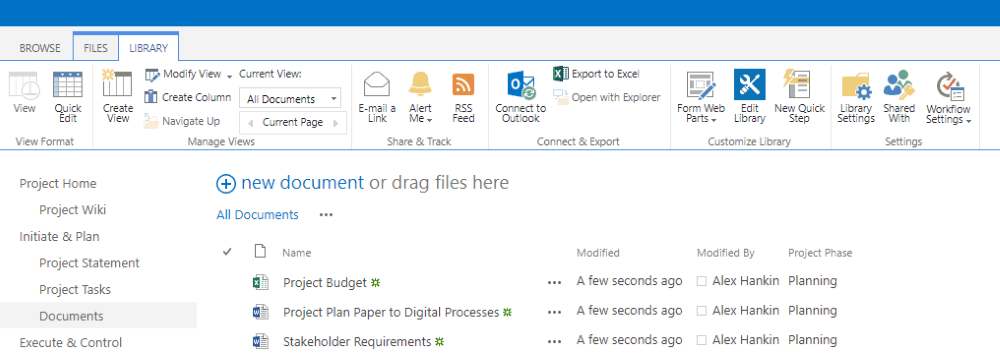
As teams upload files, they can categorize the document by phase (Planning, Executing, Monitoring, and Close) to make it easier to find.
2. Filters and Views
Once the metadata is in place, it becomes easier to filter files and create views. Simply click the relevant column and select a filter.
You can also create views to find documents you use frequently or need for particular phases of the project.
Types of Views in SharePoint
There are four types of views in SharePoint:
- Standard, the view applied to a newly created library (no filter applied).
- Calendar view, which renders a list as a calendar.
- Datasheet view, useful for bulk editing in an Excel-like grid.
- Gantt view, which is handy for tracking deadlines and project timelines.
Creating a Custom View
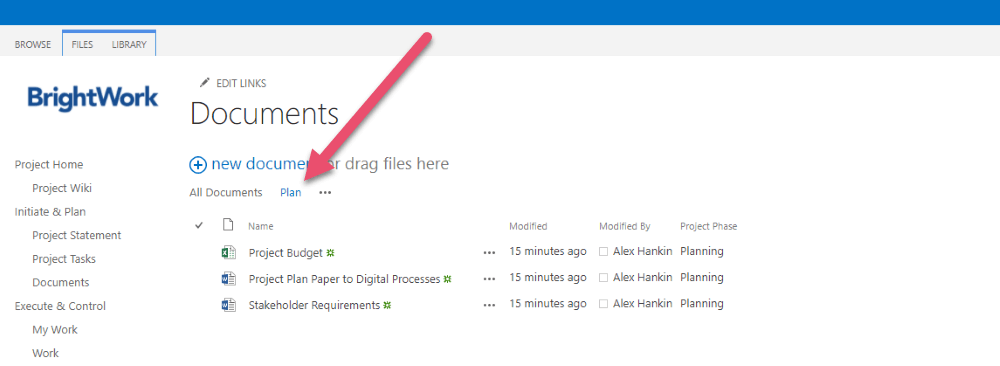
To create a view based on the ‘Project Phase’ filter:
- Navigate to the ribbon and select ‘Create View.’ In this example, we’ll use the ‘Standard View’.
- Give the view a name and select the relevant columns.
- Use the sort and filter options to refine the data. I’ve picked ‘Project Phase is equal to Planning’ under Filter.
- Finally, save your view. Here, I’ve used ‘Plan.’
As you can see, the view is added to the top of the library and displays only design documents. At any time, users can view the entire library by clicking ‘All Documents.’
Private vs. Public Views
There’s also an option to add the view as private (for your use only) and public (for anyone using the site).
Creating public views for your team as the project progresses is a simple way to collaborate. In this case, the design team can easily find their documents as needed.
3. Co-Authoring
Introduced in SharePoint 2013, co-authoring allows two or more people to work on a file and save their updates at the same time. Co-authoring is the default setting for SharePoint Server and SharePoint Online.
Benefits of Co-Authoring
Document co-authoring eliminates several problems with file management, including:
- Sending versions of a file via email.
- Storing multiple versions of the same file.
- Combining different files into a single master file.
- Losing or overwriting edits.
This feature is especially useful for remote team members or when working through updates on a conference call or meeting.
How Co-Authoring Works
Here’s how co-authoring works:
- Open and use the file as usual. A presence notification in the top-right-hand corner of your document indicates who else is viewing or editing the document.
- Refresh the document anytime to view the new updates.
- Co-authoring replaces the ‘check-in’ and ‘check-out’ system. Previously, when a document was ‘checked out,’ it was unavailable for editing by another team member.
- If you’re working with sensitive documents or need to control edits, you can manually enable this functionality as needed.
- Team members can add comments about their changes to provide useful context to another person.
- Use ‘check-out/check-in’ with caution, as this can slow teams down.
Co-Authoring Limitations in Excel
Excel files work differently. The Excel desktop app does not support co-authoring in SharePoint Server. As explained by Microsoft:
“The Excel client application does not support co-authoring workbooks in SharePoint Server. The Excel client application uses the Shared Workbook feature to support non-real-time co-authoring workbooks that are stored locally or on network (UNC) paths. Co-authoring workbooks in SharePoint is supported by using the Excel Web App.”
In the next section, we’ll see how version control works with co-authoring.
4. Version Control
Version control allows authors to revert to a previous version of a document if needed. This setting is a useful way to control edits and retrieve lost data.
Each update to a file is stored as its own instance, which can be restored. To do this, the filename and location must remain the same, and a recent version of the file must be available.
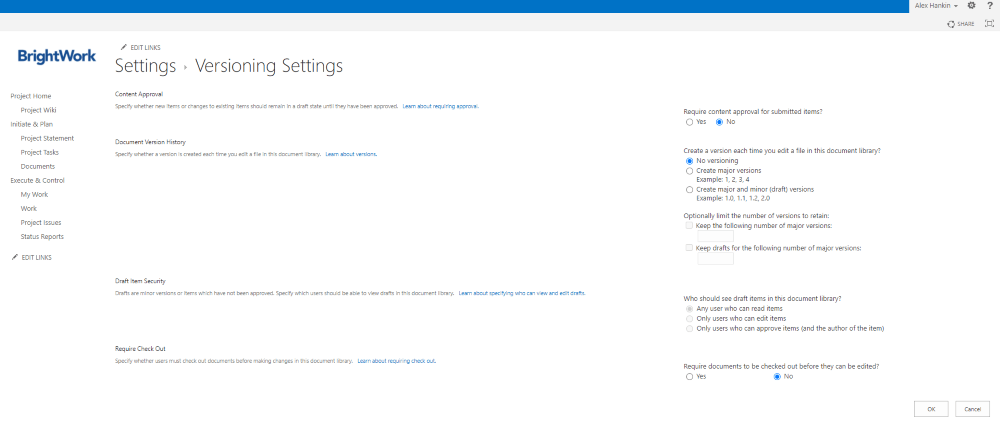
Types of Versioning in SharePoint
SharePoint Server has three types of versioning:
- No versioning, meaning no previous iterations of a document, is stored.
- Create major versions is used to create numbered versions of a document to track edits.
- Create major and minor versions to track all changes, using a numbering scheme like 1.0 and 1. and so on. This is useful for distinguishing between final and draft content.
Activating Version Control
Use these steps to activate version control in your SharePoint site.
- Go to a document library.
- On the Ribbon, click on “Library” and “Library Settings.”
- Under “General Settings,” click on “Versioning Settings.”
- Select the relevant settings. You can also limit the number of saved versions to manage storage and site performance. If in doubt, check with your IT team.
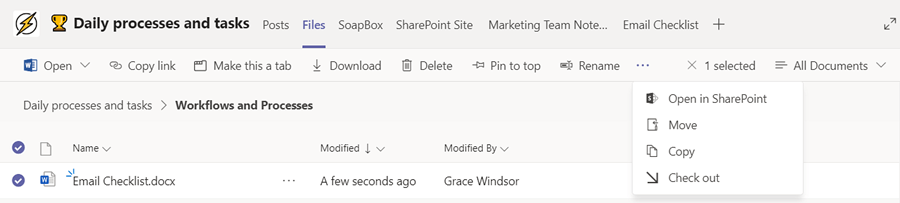
- Once version control is activated, access the version history by clicking the three dots beside a file:
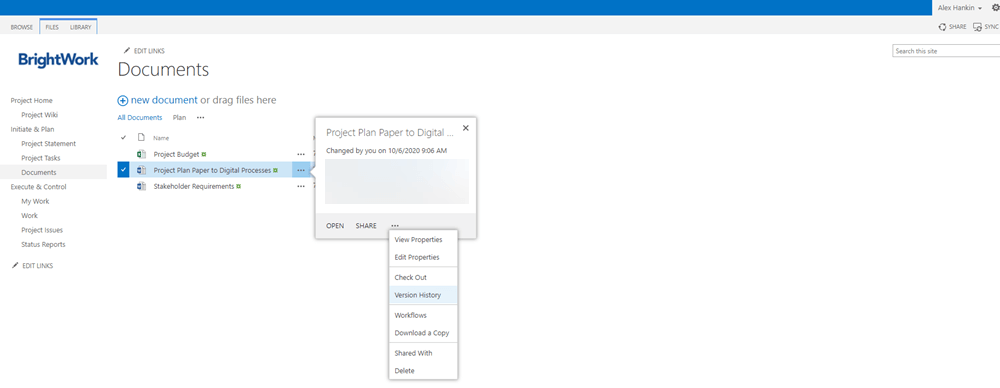
- Review and restore the relevant version as needed.
Best Practice Tips for Your Document Library
The above suggestions will help your team to find and use project documents quickly whilst maintaining control over edits and versions.
Here are a few additional tips to get the most from your SharePoint document library.
Improve Accessibility with Shared Links
Ask the team to share documents as links in emails or team chats instead of attachments. A simple change to eliminate document silos and ensure files are shared securely.
Standardize Documents with Templates
Consider adding some blank templates to your site, for example, a timesheet or presentation deck for project documentation. This helps everyone to follow the same structure – great for collaboration and reporting!
Stay Updated with Alerts
Set up alerts to track document updates. Choose the file and select ‘Alert Me’ from the library ribbon.
Fill in the various fields on the form and choose when you wish to receive a notification, for example, ‘anything changes,’ and then save the settings.
Simplify Team Collaboration with BrightWork 365
A SharePoint document library simplifies file management, making collaboration more efficient. Following best practices keeps document libraries structured and secure.
BrightWork 365 offers project management solutions that improve document collaboration, automate workflows, and enhance reporting. Watch our Demo to see we can help optimize your SharePoint experience and drive project success.