How to Use SharePoint for Project Management
Posted by Billy Guinan | 20 Min Read | Updated August 20, 2024
Overview
From configurable lists to document management, search, and automated workflows, it’s easy to see why Microsoft SharePoint Server is still a popular project management tool.
A SharePoint site brings all project information into one central location, making collaboration and reporting much easier.
However, configuring and using SharePoint for project management requires both SharePoint and project management knowledge.
Using this guide, you’ll find out how to manage your projects on Microsoft SharePoint with a free, pre-configured template from BrightWork.
By the end of the guide, you will have learned how to initiate, plan, track, and report using SharePoint for project management (server version of SharePoint 2016 or 2019).
Collaborative Project Management Process
Collaborative Project Management
“If you’re in an organization and you want to do something new, strategic, exciting, challenging, difficult – it’s a project.”
Éamonn McGuinness, Author, Collaborative Project Management: A Handbook, and CEO, BrightWork.
The Project Management Institute (PMI) defines project management as ‘the application of knowledge, skills, tools, and techniques to project activities to meet the project requirements.’ The purpose of effective project management is delivering a positive change for your organization or customers.
Project management is a vital business activity but it’s not getting any easier! Projects fail every day with serious consequences for the financial stability and reputation of organizations. The causes of project failure are numerous:
- No tool or process for managing projects
- Lack of project visibility
- Work and data silos
- Ineffective task tracking
- Poor team motivation and engagement
- Neglecting to document ‘Lessons Learned’ after each project.
To help our customers introduce a standardized approach to project management, win internal buy-in for project management, and provide training, we developed a guide to collaborative project management.
Collaborative project management helps individuals from different departments, teams, and locations work together to deliver a project successfully.
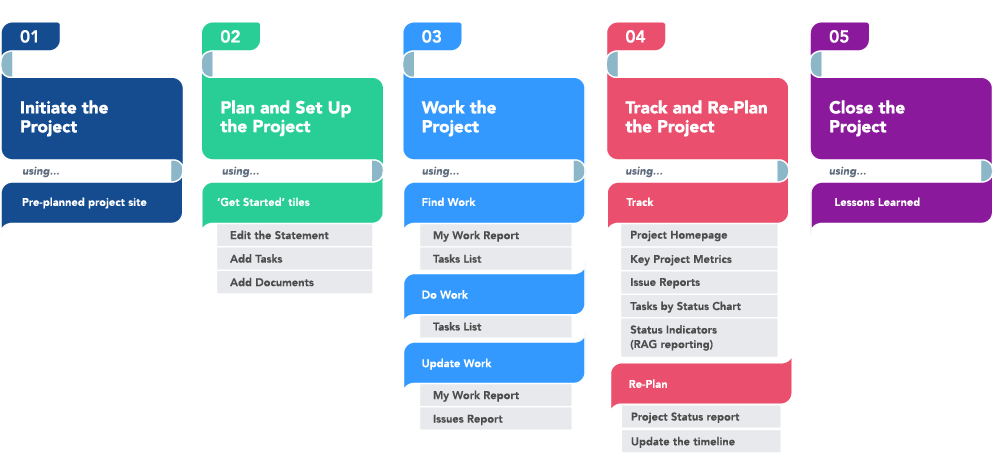
Collaborative project management encompasses five stages:
- Initiate the Project
- Plan and Setup the Project
- Work the Project
- Track and Re- Plan the Project
- Close the Project.
Each stage has three associated steps, addressing people, process, and technology over the course of the project.
The steps are summarized below. If you want to learn more about each stage and collaborative project management, download a free PDF copy of Collaborative Project Management: A Handbook.
5 Stage Project Managment Process
Initiate the Project
Starting your project the right way creates the foundation for the work to come. During this stage, you will start to work with your project sponsor, decide how to manage the project, and create the project site.
You’ll need to:
- Get the project approved, sponsored, and resourced. This will typically involve creating a project charter to help define the objectives of the project, the scope of work, timelines and so on.
- Decide on a project management approach.
- Create a collaborative project site.
Plan and Setup the Project
With the project site in place, you can
- Plan the project by adding tasks and a document repository to your project site.
- Desk check the project plan with the sponsor and the team. Update tasks and timelines as needed.
- Notify the team of their responsibilities in a project kick-off meeting.
Work the Project
During project execution, help your team to:
- Find their work.
- Do their work!
- Update their work quickly using various reports in the project site.
Track and Re- Plan the Project
Projects rarely run according to plan, making it essential to continuously track and re-plan the project.
Some project managers are natural re-planners and do this daily as work progress. For others, re-planning needs to be added as a task to the project plan. Whatever your preference, re-planning is a key project management activity.
To track and re-plan your project:
- Check and understand the status of the project using key reports.
- Find and manage exceptions such as Issues.
- Re-plan the project by updating tasks and adding a project status report.
Close the Project
The more you learn from the project you have just completed, the more successful you will be with the project you are about to start.
Once the project is completed, it’s a good idea to formally close the project.
- In your project site, mark tasks and issues as complete, and update any relevant documents in the project site.
- Run a project retrospective with the team and add a ‘Lessons Learned’ document to the site.
As you’ll see later on, achieving this way of working is very easy with the Free SharePoint Project Management Template and SharePoint project management dashboard.
Why Use SharePoint for Project Management
The Elements of SharePoint
Now that you’ve read about collaborative project management, it’s time to learn why Microsoft SharePoint is a great project management tool.
You’ll also find out more about the Free SharePoint template from BrightWork, which is an easy way to start managing projects on SharePoint (SharePoint 2013, 2016, 2019).
Launched in 2001 as a web-based collaborative tool, Microsoft SharePoint is used by over 400,000 customers in 250,000 organizations worldwide, including 85% of Fortune 500 companies.
SharePoint is available as a server-based On-Premises solution, a cloud-hosted solution, or a hybrid solution, which combines an On-Premises installation with Office 365.
Unlike Word or Excel, SharePoint is not a single tool. Instead, SharePoint is a collection of tools designed to help organizations build intranets, manage documents, and collaborate in a secure environment.
SharePoint provides a number of features and functionality to help drive collaboration including:
- Document management and sharing
- Intranet portals
- A newsfeed
- Wikis and forums
- Knowledge management.
SharePoint also offers numerous security settings such as encryption and permissions to help you control who can access and edit project data.
As a project is a highly collaborative activity, it makes sense to use SharePoint for project management. Think about common project management challenges – no process, lack of visibility, multiple versions of the same document, manual reports, poor communication and so on.
Using SharePoint for project management to bring all project information and tasks into one central place can resolve many of these problems. The project site can be structured to match your project approach, helping to standardize project delivery and improve visibility.
SharePoint has a number of elements suited to effective project management – lists, web parts, sites, and site collections.
SharePoint Lists
A list is a way of organizing information in SharePoint. Made up of headings, rows, and columns, a SharePoint list is quite similar to an Excel spreadsheet, but with more flexibility.
SharePoint Web Parts
A SharePoint web part is a type of list used to store content in your site. Like an app on a smartphone, web parts such as contacts and announcements enhance the functionality of your site.
SharePoint Site
A SharePoint site is used to organize different types of content in one place. A SharePoint site is a home for your project, bringing together lists (information and processes) and web parts (dashboards and reports) in one central location for your team.
SharePoint Site Collection
A SharePoint site collection is a collection of SharePoint sites. When applied to project management, a site collection acts as your project portfolio, rolling up information from various projects in one place.
Site collections are typically used in large organizations with different project requirements for each business unit.
SharePoint Project Sites
As you can see, SharePoint is a powerful project management tool. A SharePoint project site centralizes all project information, connects your team to the project, and makes reporting much easier. No more outdated Excel files. There is a caveat, however; SharePoint doesn’t look like a project management tool out of the box.
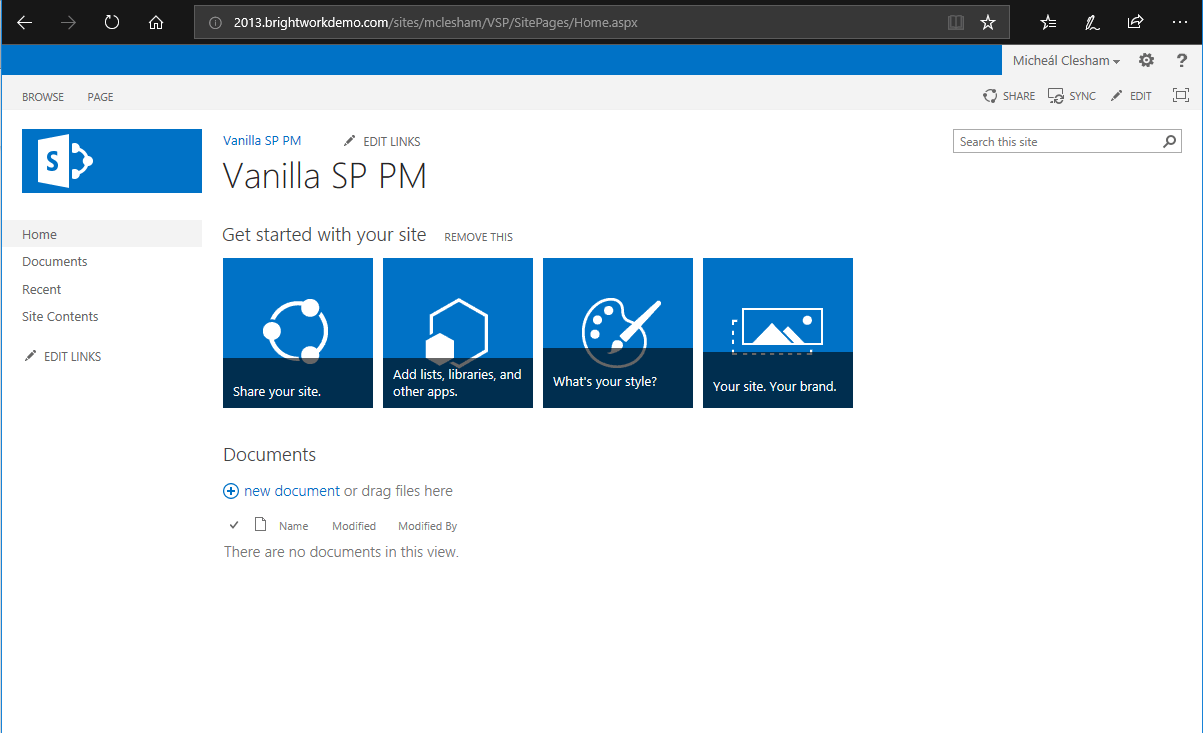
Below is an image of a typical SharePoint site without any configuration.
If you decide to use out-of-the-box SharePoint for project management, you will need to configure your site – or ask your IT team to do so.
It’s a long process, especially if you don’t have any SharePoint development experience or simply don’t have the time.
Of course, if you do have some SharePoint development experience and are willing to roll up your sleeves, creating a SharePoint project site is not just adding lists or web parts. You also need to make sure you have the right project management process in place. The formula for a successful project on SharePoint is something like:
SharePoint knowledge + project management knowledge + a project site = success
If one element of this formula is off, your project is at risk. That’s where the Free SharePoint Project Management Template from BrightWork will give you a head start.*
Based on the Project Lite template in the BrightWork solution, the free template has everything you need to initiate, plan, track, and report on a single project site using SharePoint On-Premises.
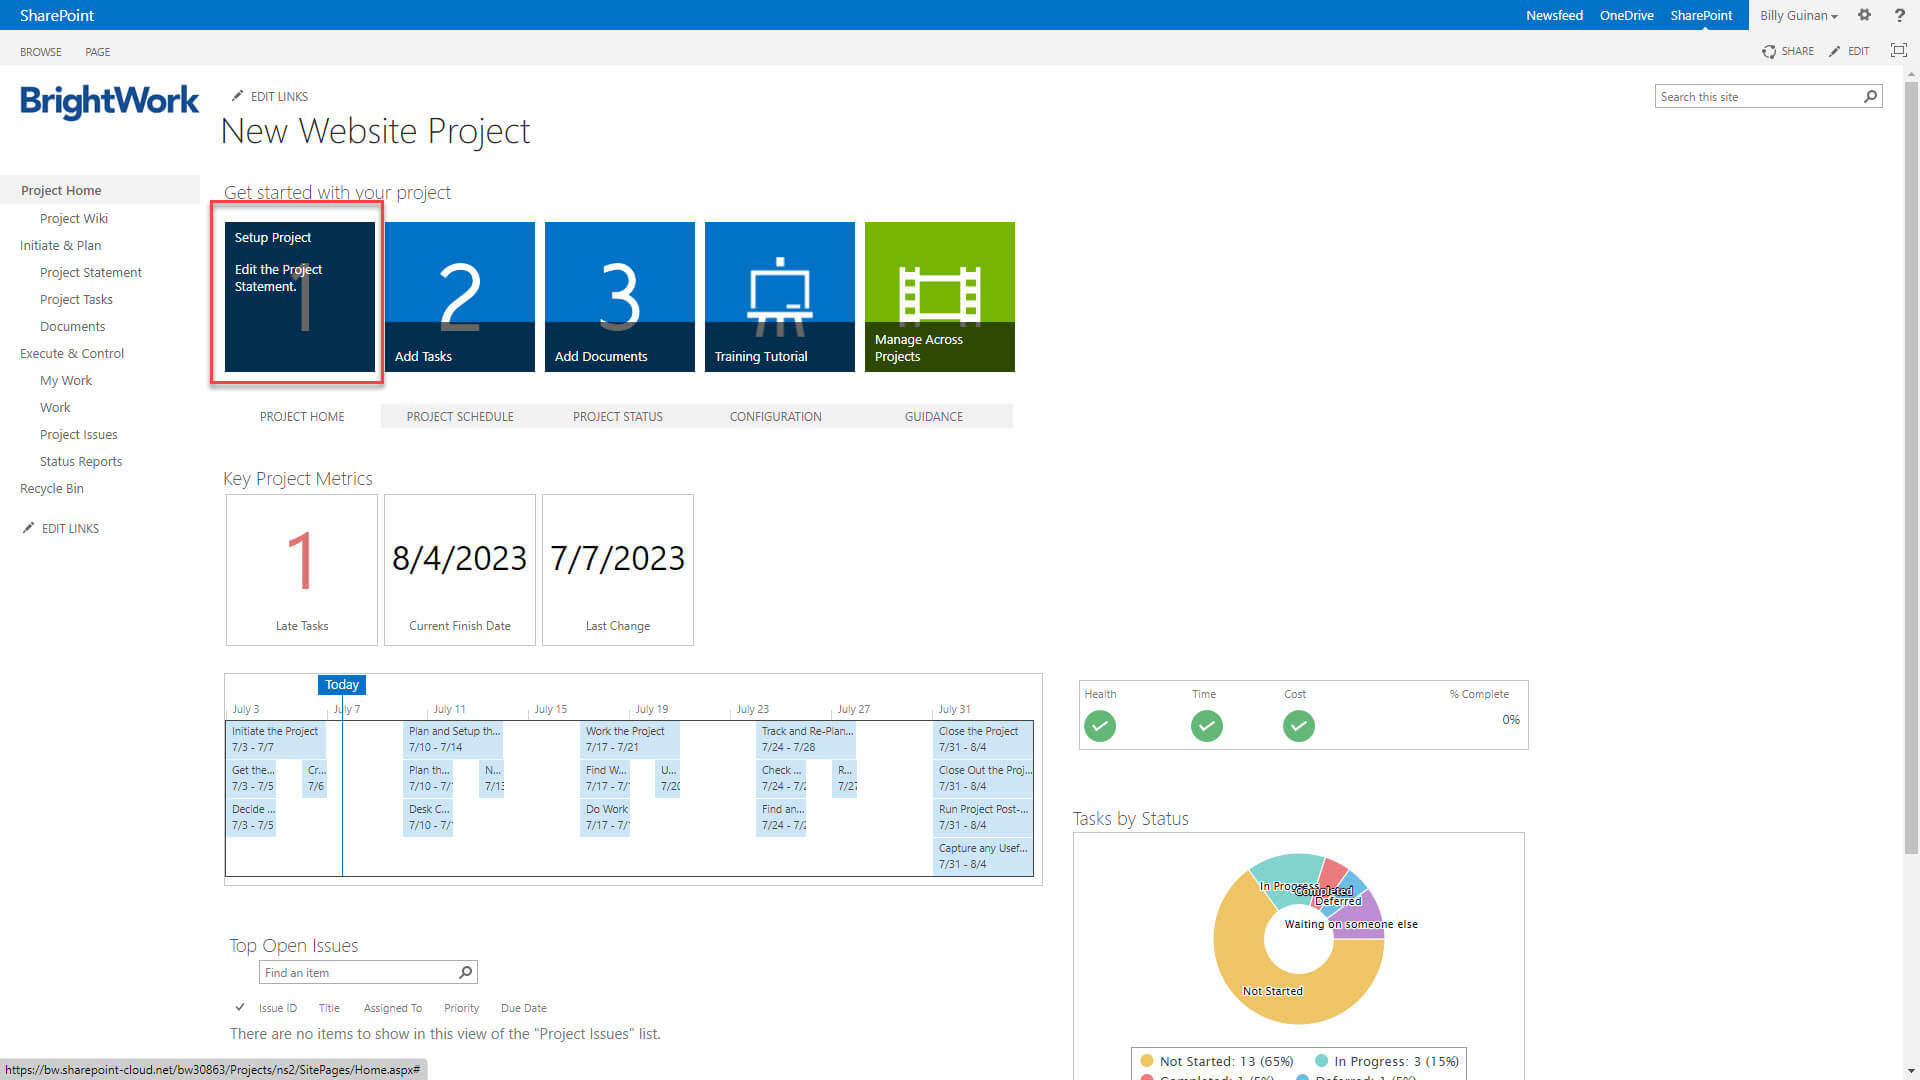
In addition to the lists and web parts mentioned above, the template includes metric tiles, RAG (red-amber-green) reporting, project status reports, Work reports, and a ‘tasks by status’ chart.
The template is based on the five-step approach to project management outlined above, with tools to support each stage:
Download a Free SharePoint Template
40,000 organizations use BrightWork to manage their projects and portfolios on SharePoint On-Premises (2019, 2016).
Actionable Guides to Help You Manage Projects With SharePoint
The steps and screenshots in these guides have been updated to reflect SharePoint Server Subscription Edition. This guide is also applicable to SharePoint 2019, SharePoint 2016, and SharePoint Online, as well as SharePoint 2013. The template used in this guide requires SharePoint classic mode.
Step 1: Initiate a Project
Step 2: Plan a Project
Step 3: Work a Project
Step 4: Track a Project
Step 5: Close a Project
Step 1: Inititate a Project in SharePoint
A. Get the Project Approved, Sponsored, and Resourced
The first step to a project is to get the project approved, sponsored, and resourced.
With the project approved and sponsored, you need to secure project resources like key team members and budgets.
To do this, you will prepare a project charter. A project charter or statement is an outline of what is included and excluded from the project, making it a useful way to avoid scope creep.
The statement may contain the following information:
- Project identification
- Project description
- Project objectives
- Project customer
- Resources
- Scope of work
- The type of project
- The status of the project
- Start and end dates
- Project Assumptions.
Some of this information will be used to populate the SharePoint project site.
B. Decide the Project Management Process
Once the project is approved, you can choose an appropriate management process.
The free SharePoint project management template is ideal for a ‘lighter’ approach with a project statement, documents, tasks, and issues.
C. Create a Collaborative Project Site
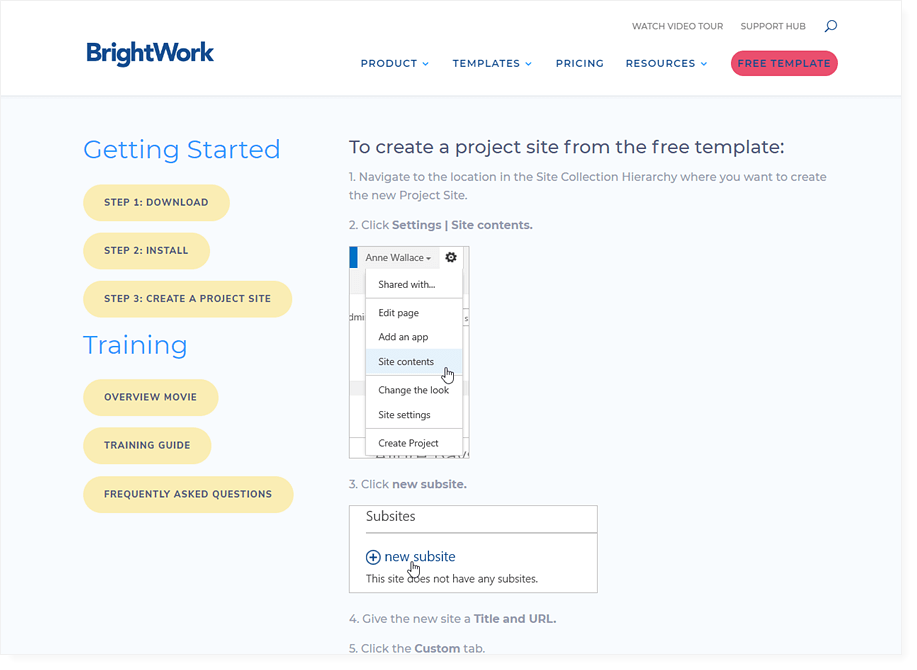
With these key decisions in place, you can now create a collaborative project site for your team using the Free SharePoint Template.
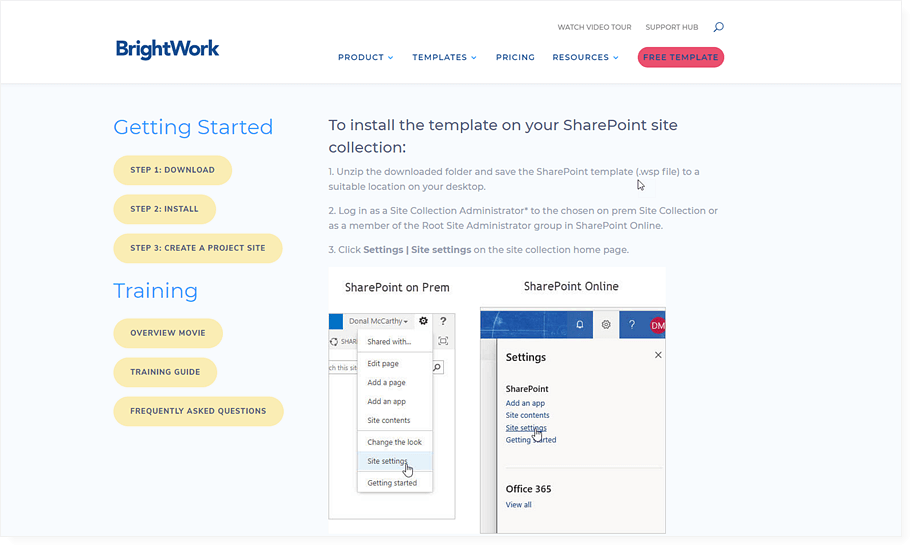
There are three simple steps to download and install the template from the BrightWork website.
1. Complete and submit a short form to download the version of the free template suitable for your SharePoint environment in a zip file. The Free Template runs on SharePoint 2013/2016/2019 and SharePoint Online.
2. Install the template in your SharePoint environment following the steps in the online guide.
3. Using the installed template, launch your first project.
Note: To install the template in your SharePoint environment, you will need to be a site collection administrator.
Step 2: Plan and Setup a Project in SharePoint
A. Plan the Project
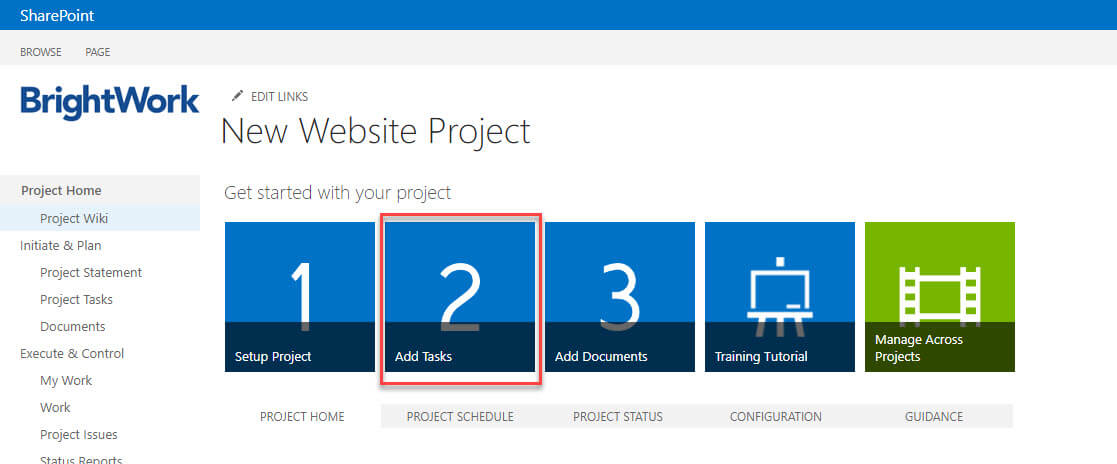
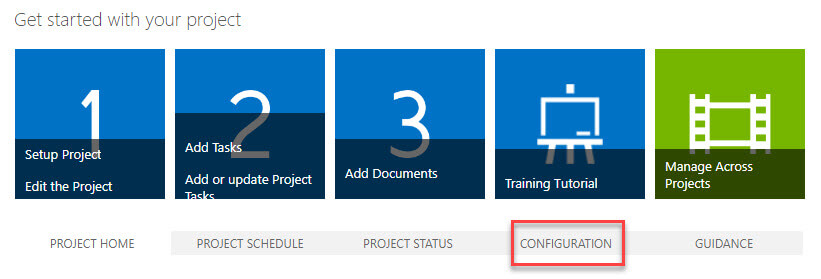
Use the ‘Get Started’ tiles to add the project statement, tasks, and documents to the project site. As explained above, these elements are lists and web parts in SharePoint.
Project Charter
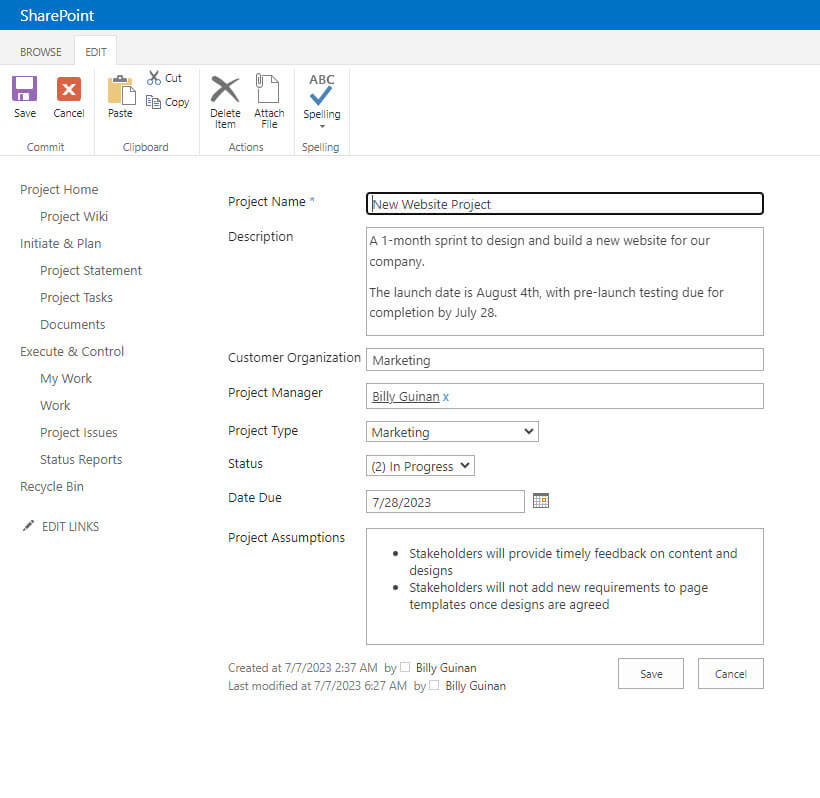
Setup Project links to the Project Charter or Statement. Click the icon highlighted below to edit the statement.
Add key information such as the project name and description, project manager, status, and due date.
Project Tasks
With the statement in place, let’s look at project tasks.
Tasks are step-by-step instructions for delivering the required outcomes for your project in an efficient way. Before adding project tasks to the site, spend some time planning and prioritizing what you’ll need.
Using this list, it’s time to assign tasks to your team so they can get to work! Click ‘Add Tasks’ to open the task list.
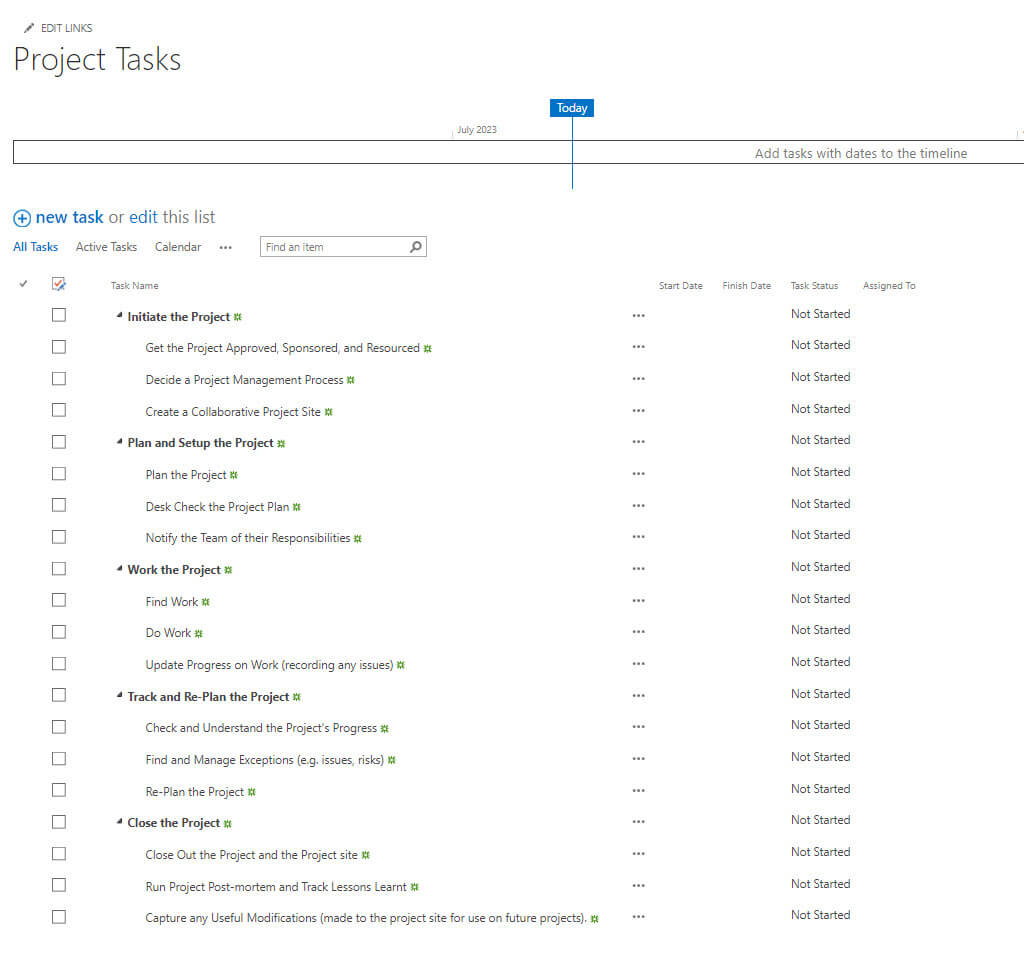
The template ships with a pre-populated list of tasks and sub-tasks of collaborative project management.
It’s easy to update each item in the list – just click the item to open the editing dialogue box.
Update the task as needed and save.
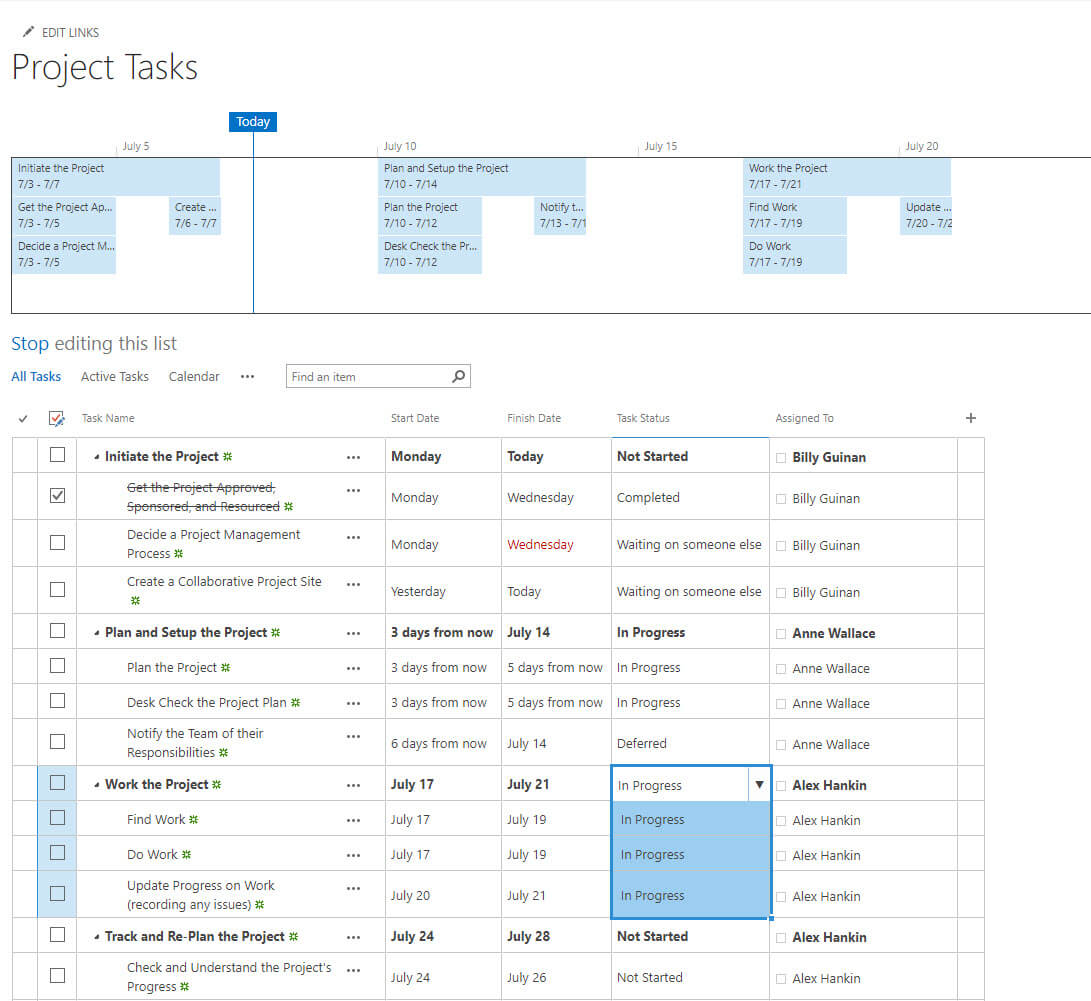
To save time, you can also make bulk edits to the task list. Let’s imagine you need to update the status and owner of tasks for project initiation. First, click ‘edit this list’ to open the datasheet view.
Next, update the status for some tasks. Drag these updates down to the relevant task and select ‘stop editing this list’ to save your edits.
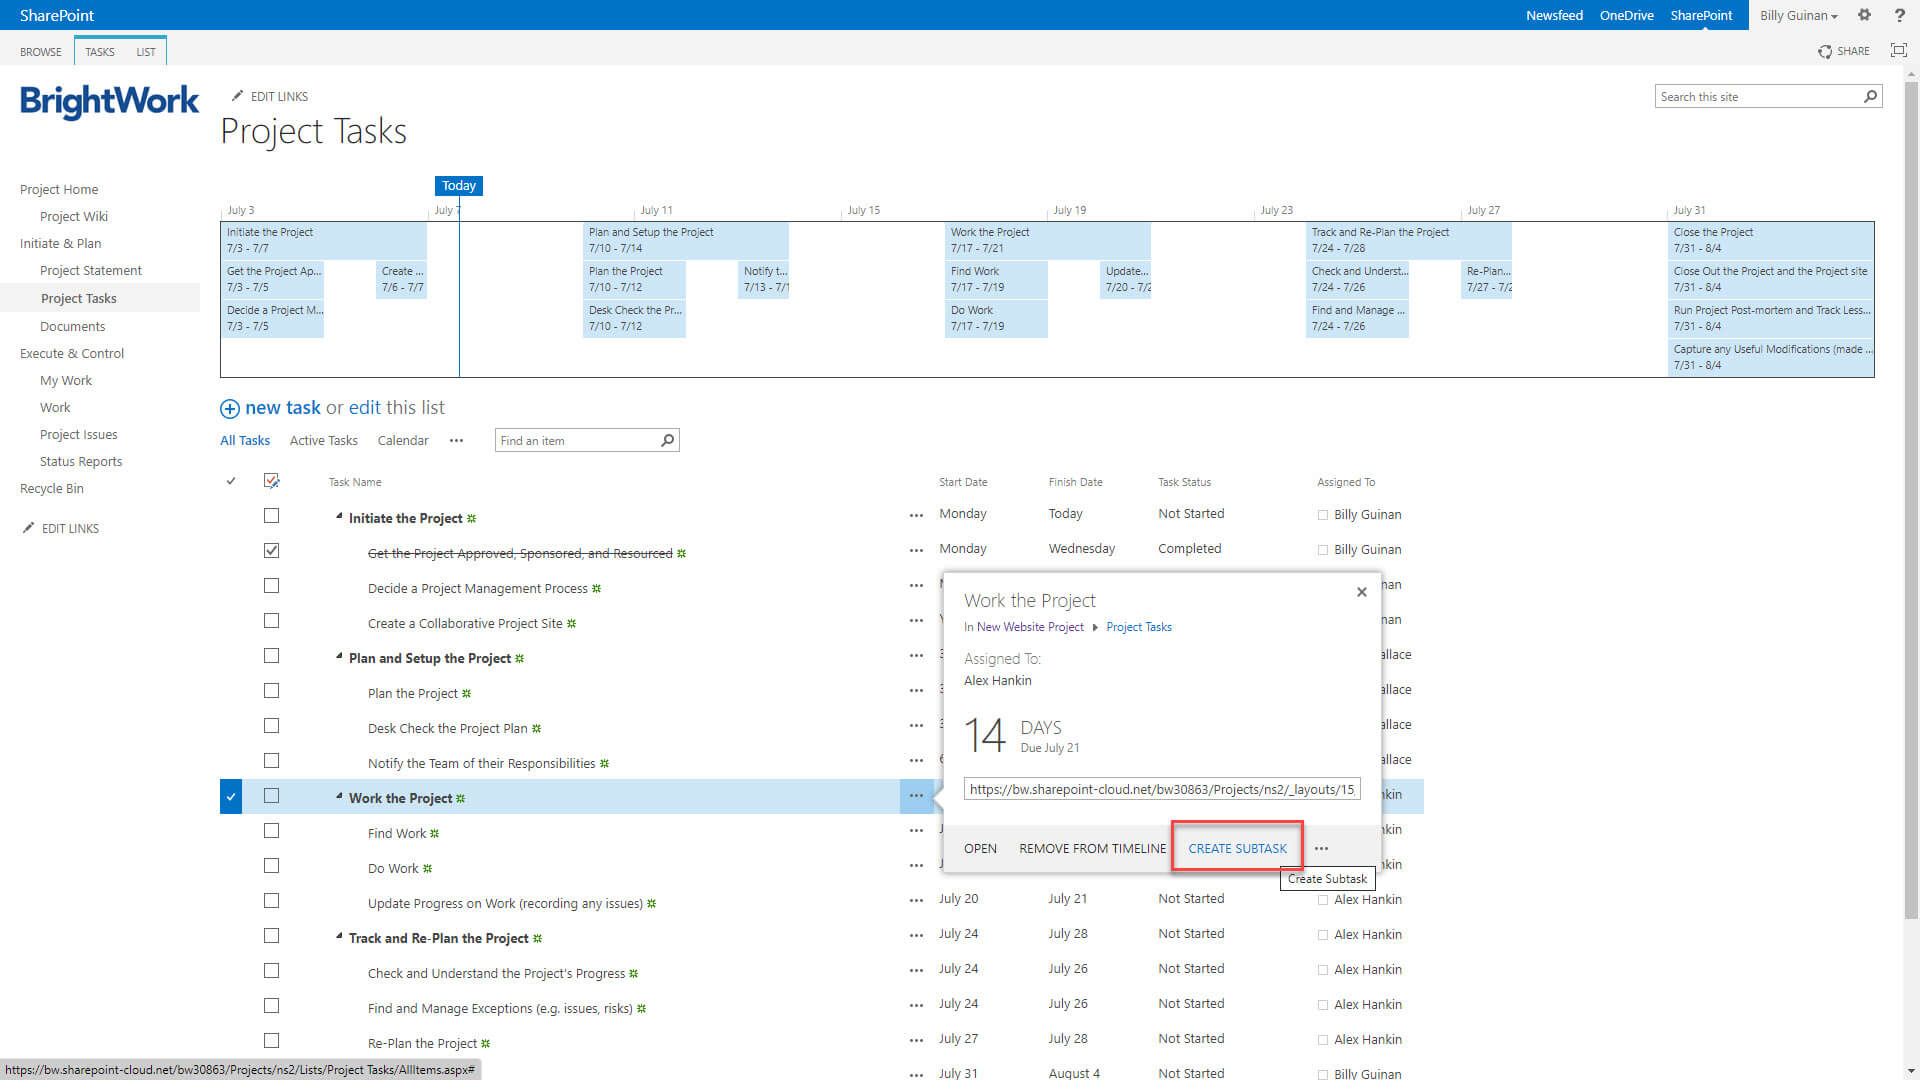
Add some tasks that are specific to the website project under ‘Work the Project’.
Right-click the editing menu beside the relevant project phase and select ‘add subtask’. Here, we have selected ‘Work the Project’.
Follow the columns to add the ‘task name,’ ‘start and finish date’, ‘task status’, and ‘assigned to’.
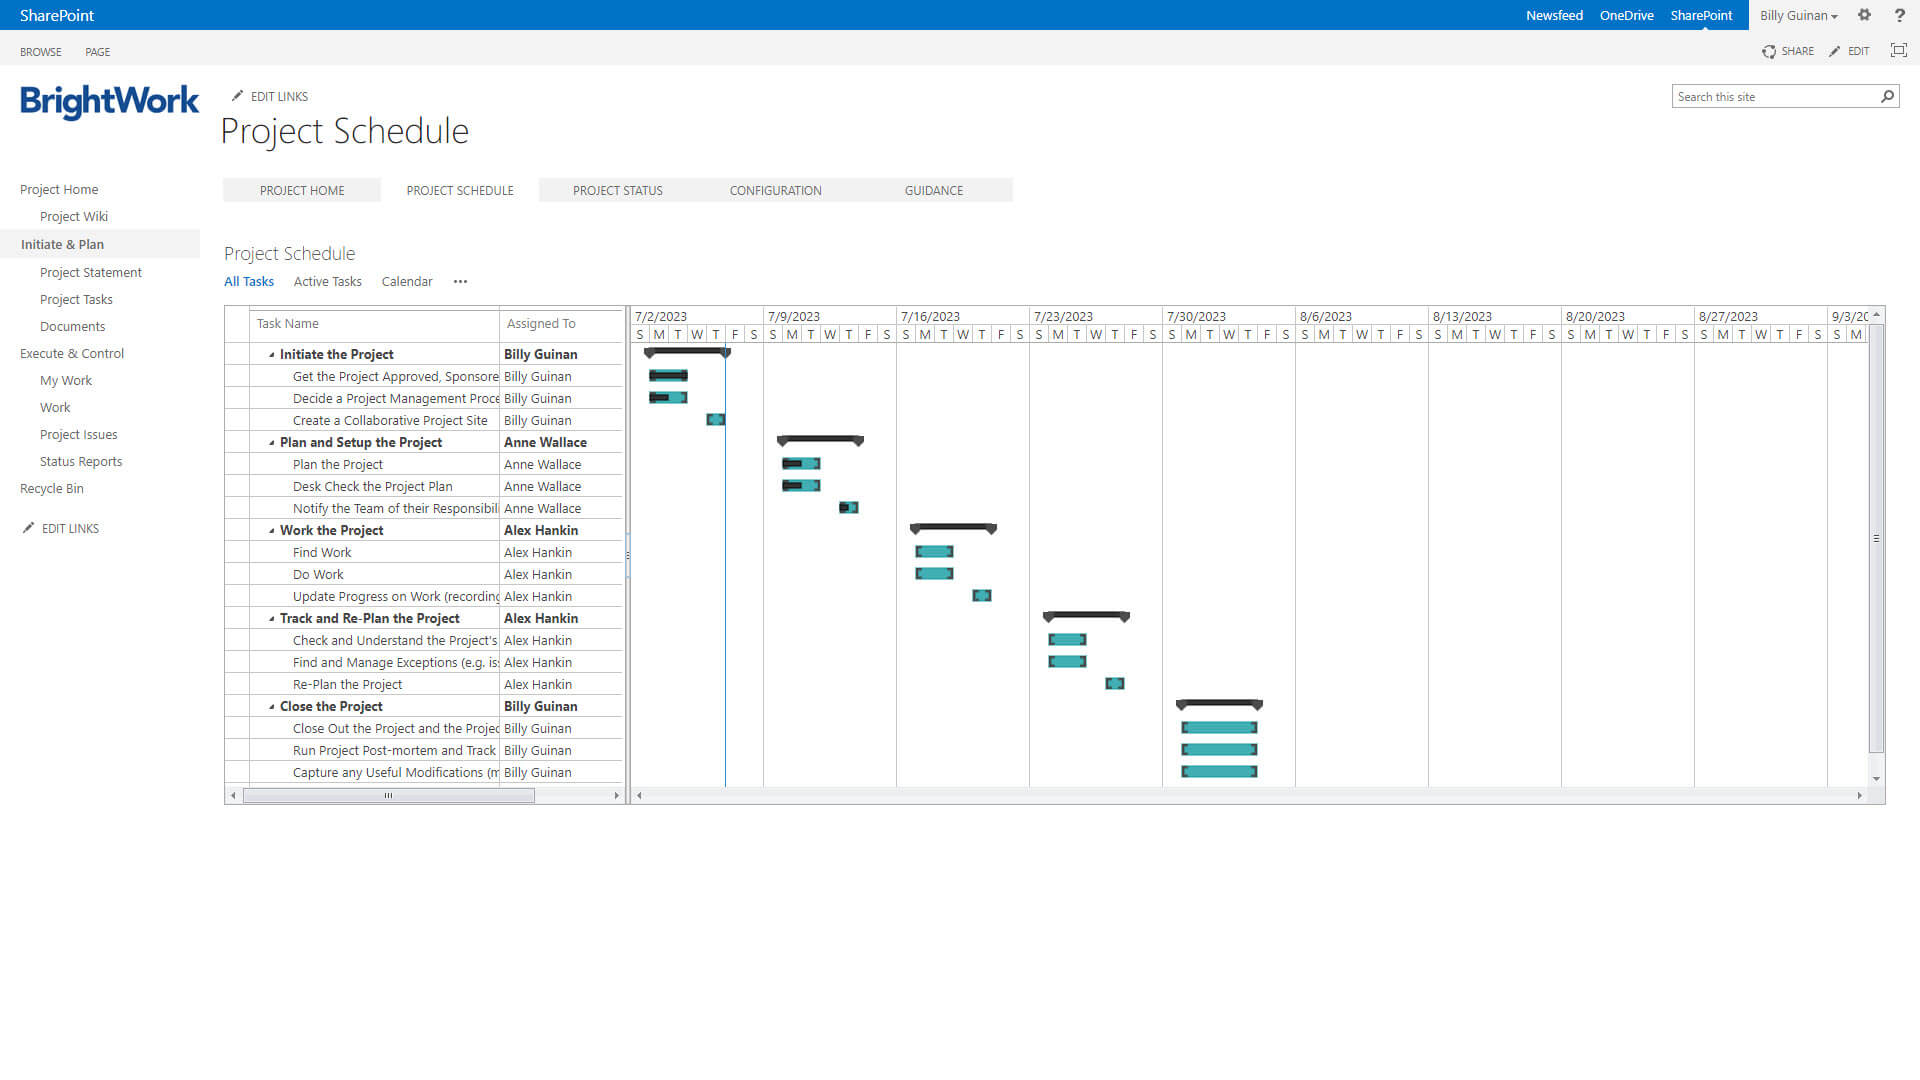
You can also view the tasks and schedule in a timeline and Gantt chart from the project homepage.
Project Documents
Easy access to project documents is key to quick, effective collaboration. With a SharePoint document library, it’s easy to centralize all project documents in one place.
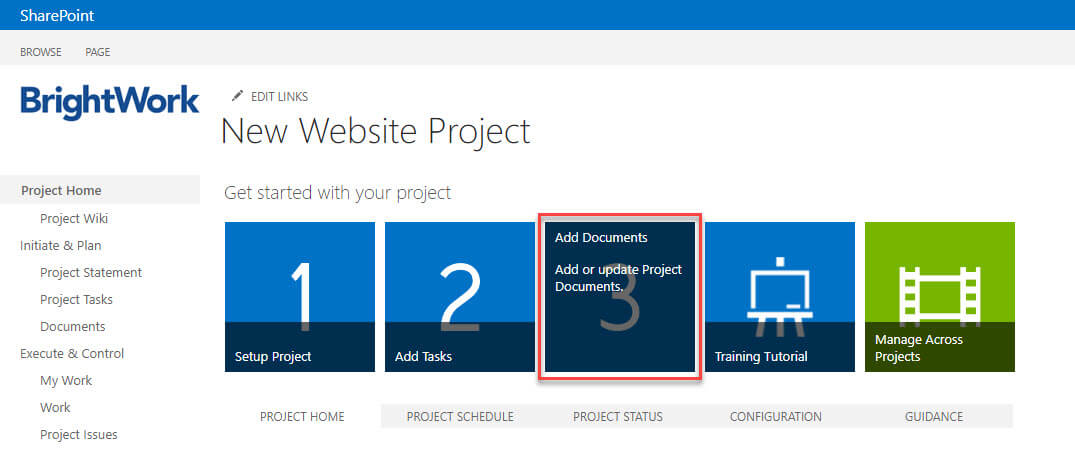
Using the third tile, add project documents to the document library.
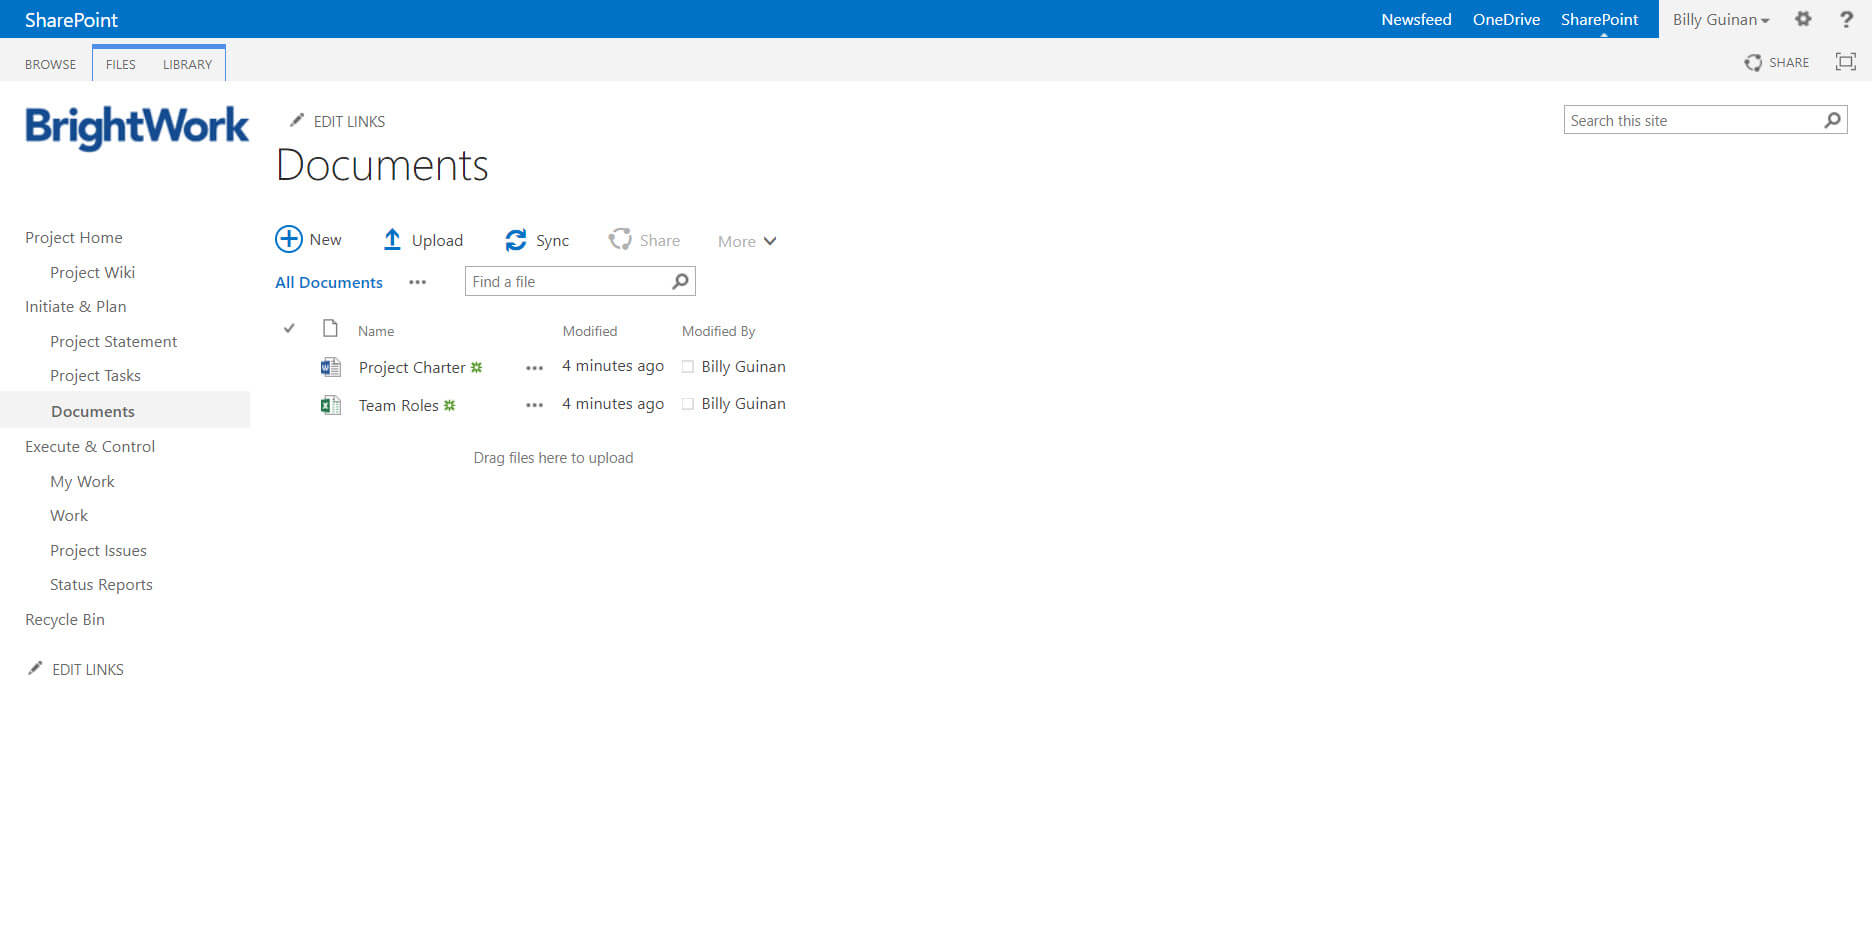
Simply click ‘new document’ to upload the relevant file.
To make it easier to search for files, it’s a good idea to agree on some guidelines with your team, for example, file names. For this project, let’s preface each file name by the area of work. For example, planning documents will include ‘plan’ in the title; the same applies to ‘content’, ‘design’ and so on.
- Plan_Project Charter
- Content_New Homepage Copy
- Design_Brief for Forms.
If our designer wants to find a document, all they need to do is search ‘design’ in the document library. Only one copy of each file will exist in the project site to avoid any confusion about the correct version. Ask the team to use the relevant file in the document library instead of creating multiple versions of the same document with different dates or notes added to the title.
Incorrect:
- Content_New Homepage Copy_201118
- Content_New Homepage Copy_211118
- Content_New Homepage Copy_Final
- Content_New Homepage Copy_Final Final.
Correct: Content_New Homepage Copy.
Finally, files will not be stored in folders in the document library – the naming convention above removes this need.
Note – to ensure edits to your document are synced to the library, download the document using Microsoft Edge. Otherwise, you’ll end up with ‘read-only’ copies of the file you will need to save locally and re-upload to the site.
Site Configuration
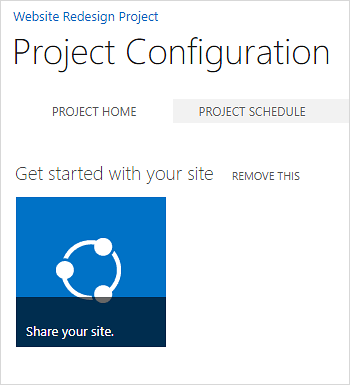
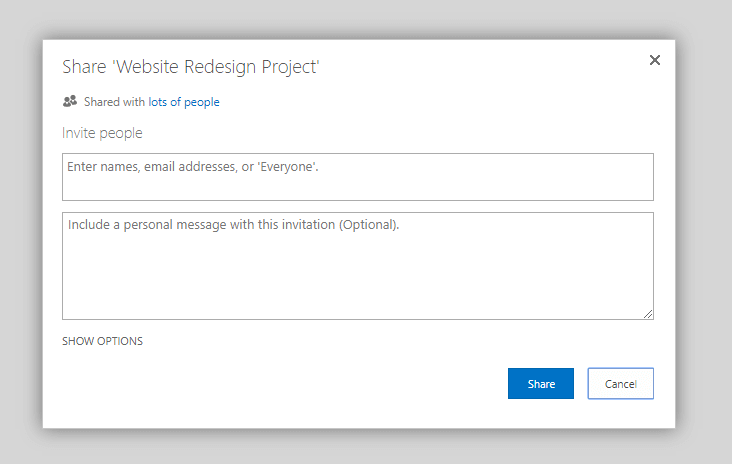
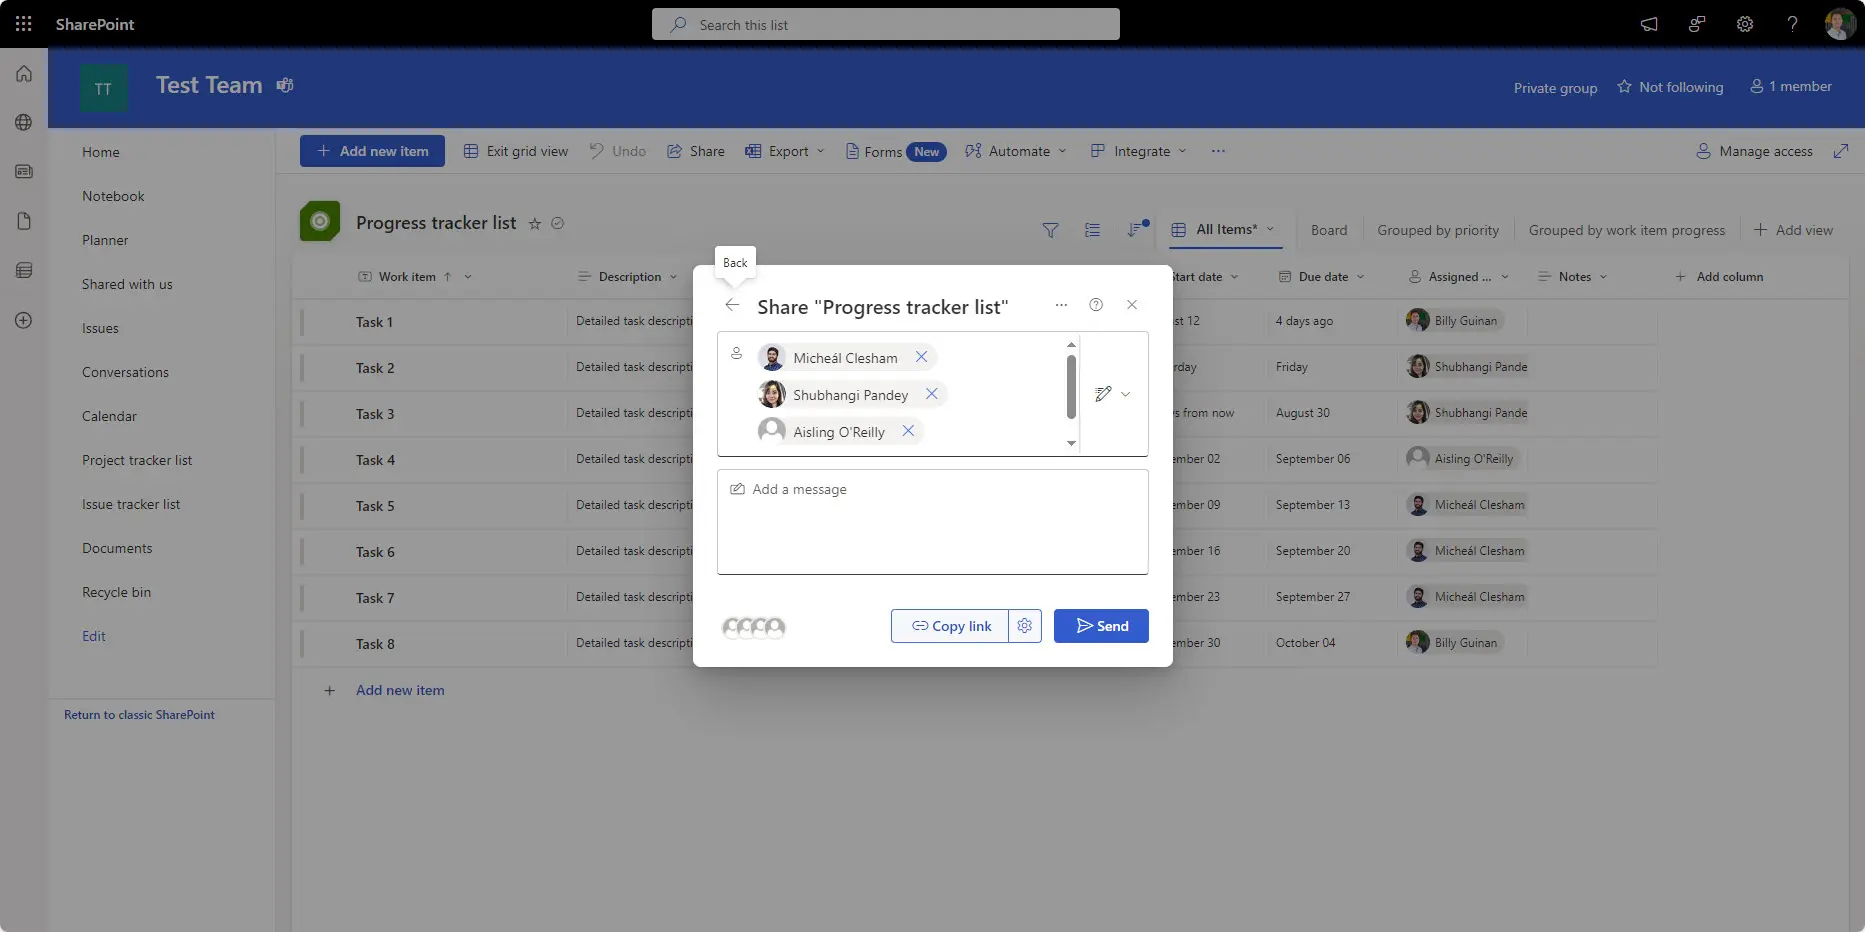
You may also wish to add users to the SharePoint site. Click on ‘configuration’, located under the ‘Get Started Tiles’.
Select ‘share your site’.
Select ‘share your site’.
You’ll notice the project homepage reflects the new information in the project site. Every time a task or issue is updated, the reports on the homepage are automatically updated. This helps to keep everyone informed about the progress of the project without the need for meetings or lengthy email chains.
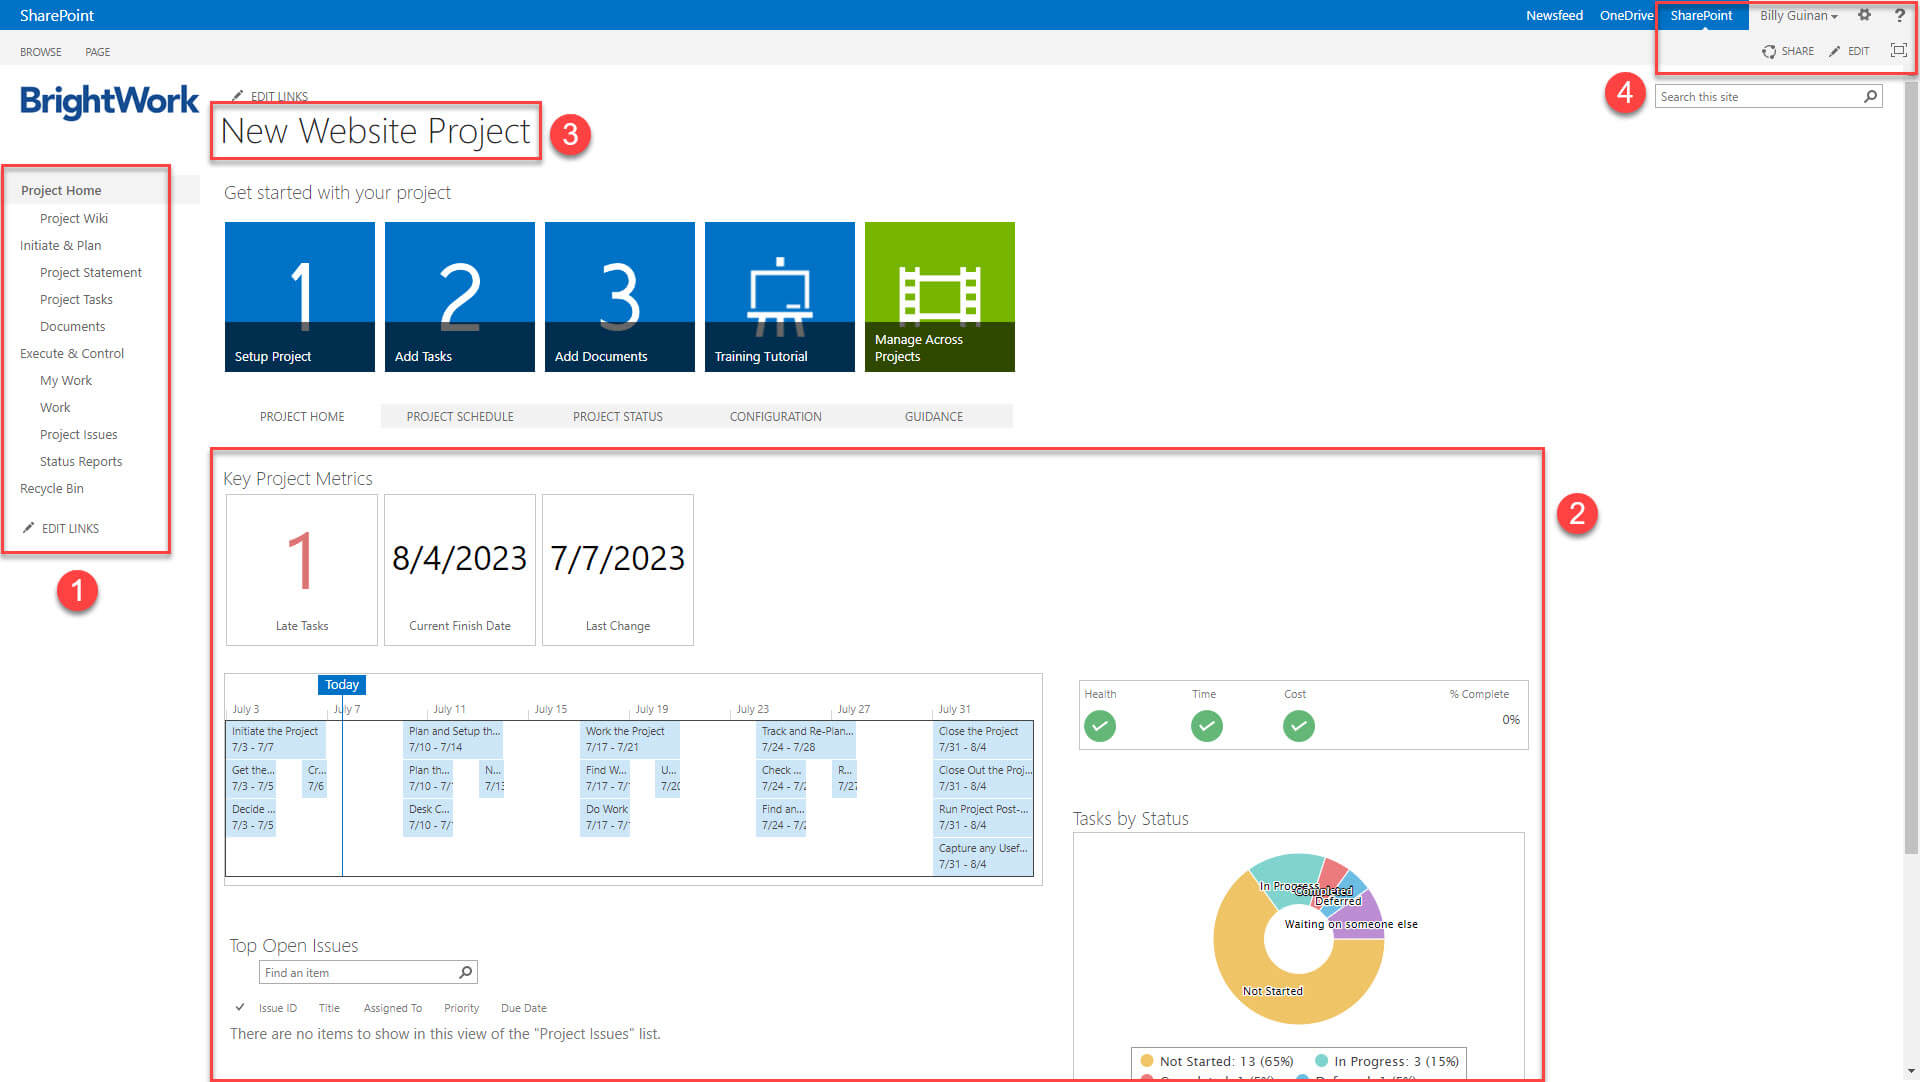
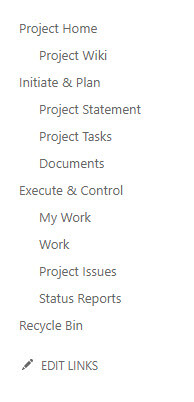
Another useful feature of a SharePoint project site is the Quick Launch, a menu with links located on the left-hand side of the project site. The Quick Launch improves navigation around the site by grouping the various web parts and lists together by phase.
B. Check the plan with your team
With the project charter, tasks, and documents now added to the SharePoint project site, ask the team and sponsor to check the site and the proposed timelines. It’s important to achieve clear alignment with everyone before the project starts to avoid project scope creep – changes to tasks and deliverables – later on.
C. Project Kick-off Meeting
Before any work begins on the project, use a project kick-off meeting to ensure everyone is clear about their roles and responsibilities. You should also establish some ways of working from the outset, for example, the team needs to update their tasks in the project site every Friday morning.
Step 3: Work the Project in SharePoint
During this critical stage of the project, you need to give team members direction on how to:
- Proceed with their tasks
- Work on key deliverables
- Work together collaboratively.
As mentioned above, daily stand-ups are a key part of communication for this project. Using the homepage of the project site in these daily meetings will help focus the team.
As such, it’s important the team can find, do, and update their work as well as report issues easily.
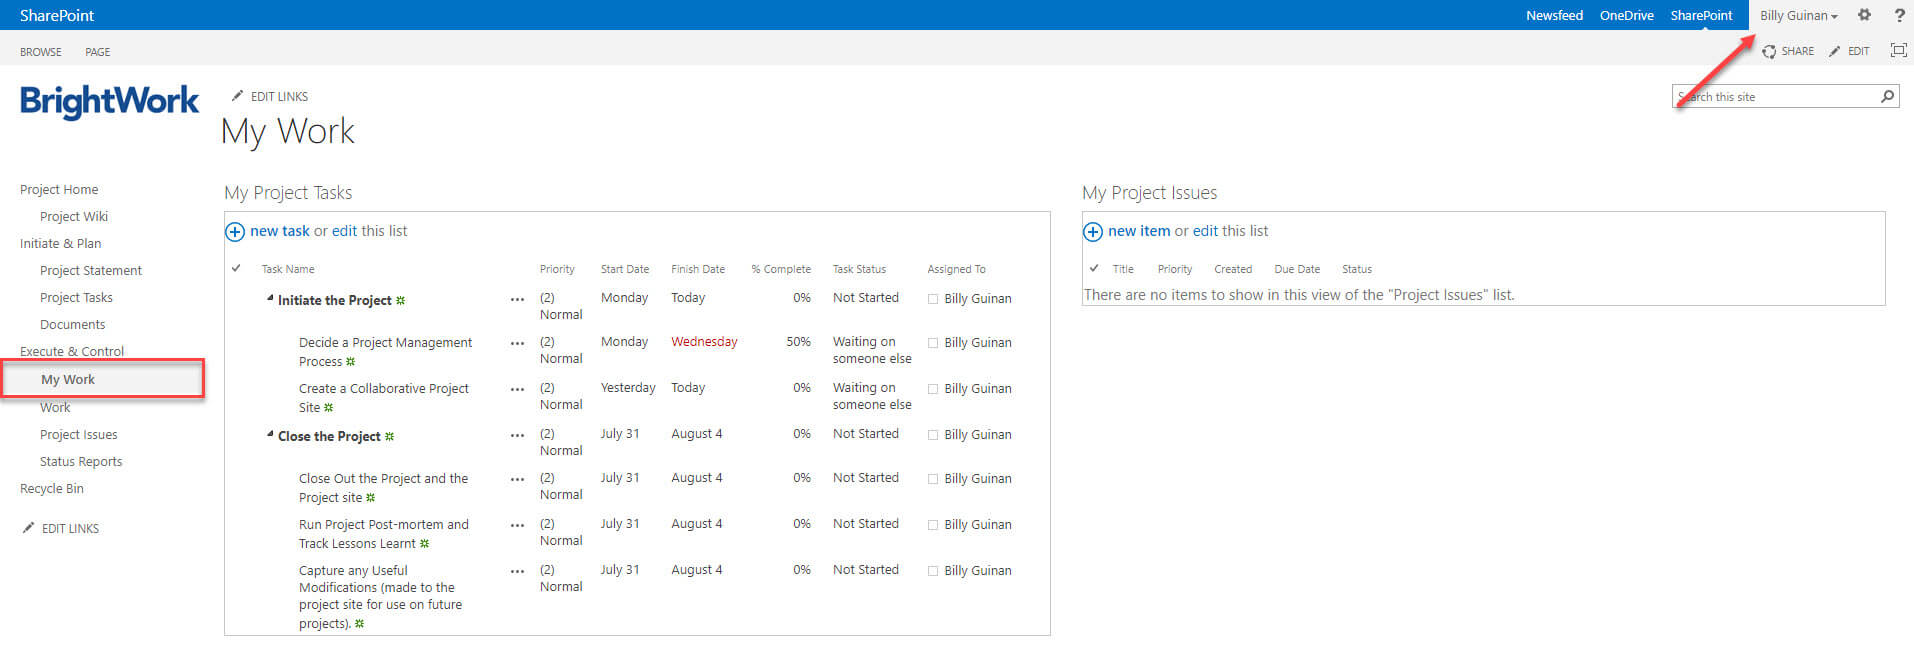
As we’ll see below, the ‘My Work’ report is designed to do this. We’ll also take a look at the ‘Work’ report (for project managers) and key data on the project homepage.
The ‘My Work’ Report
Located under ‘Execute and Control’ on the Quick Launch menu is a link to the ‘My Work’ report.
The ‘My Work’ report is a list of work assigned to the logged-in user. Each individual team member can track and update their own work.
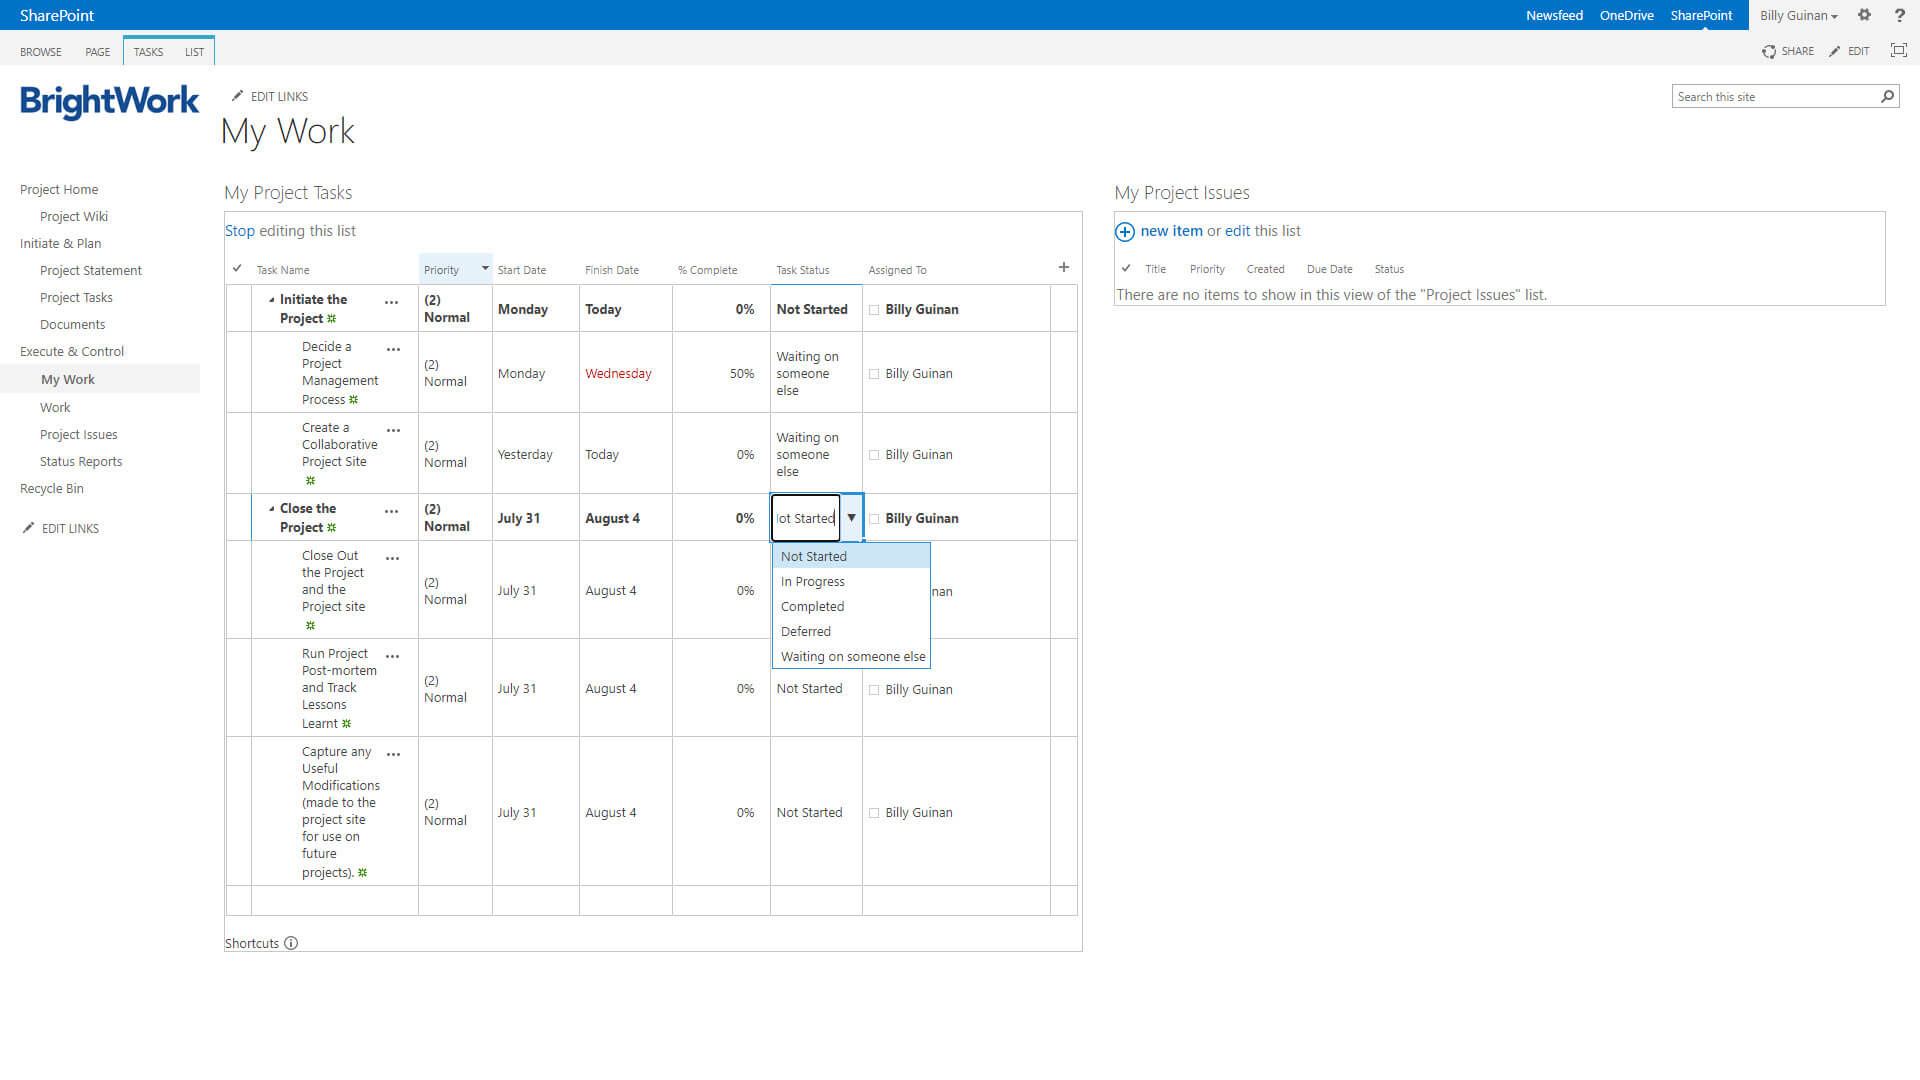
Using the Excel-like datasheet view in SharePoint, team members can easily record progress on what is complete, in progress, and or in trouble.
To edit an individual item, click the relevant task to access the editing options.
Alternatively, to make bulk updates to the lists, simply click ‘edit this list’:
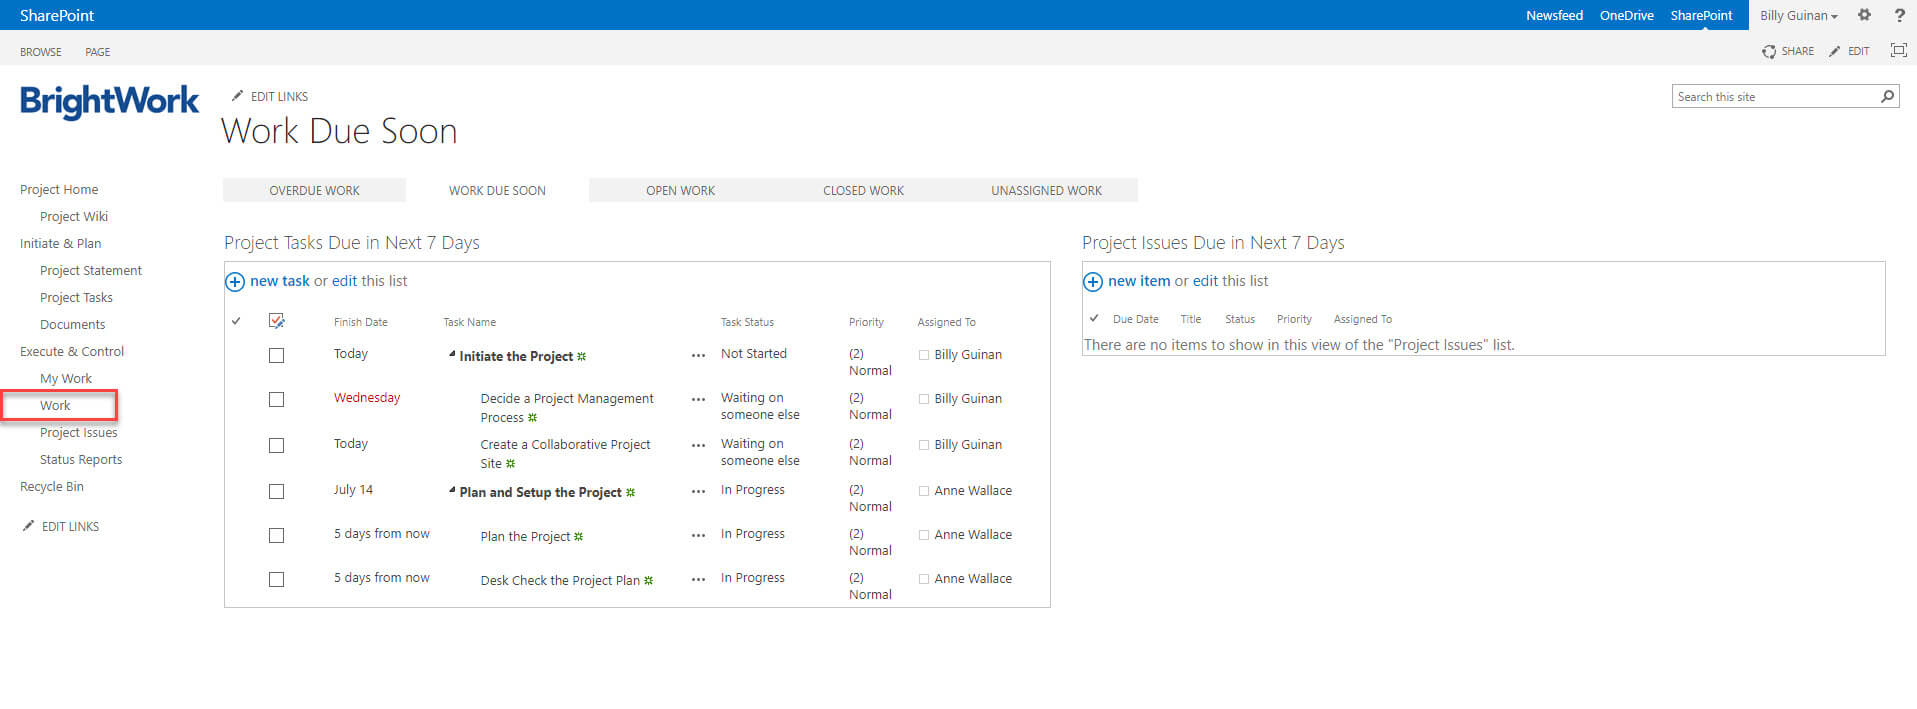
Work Report
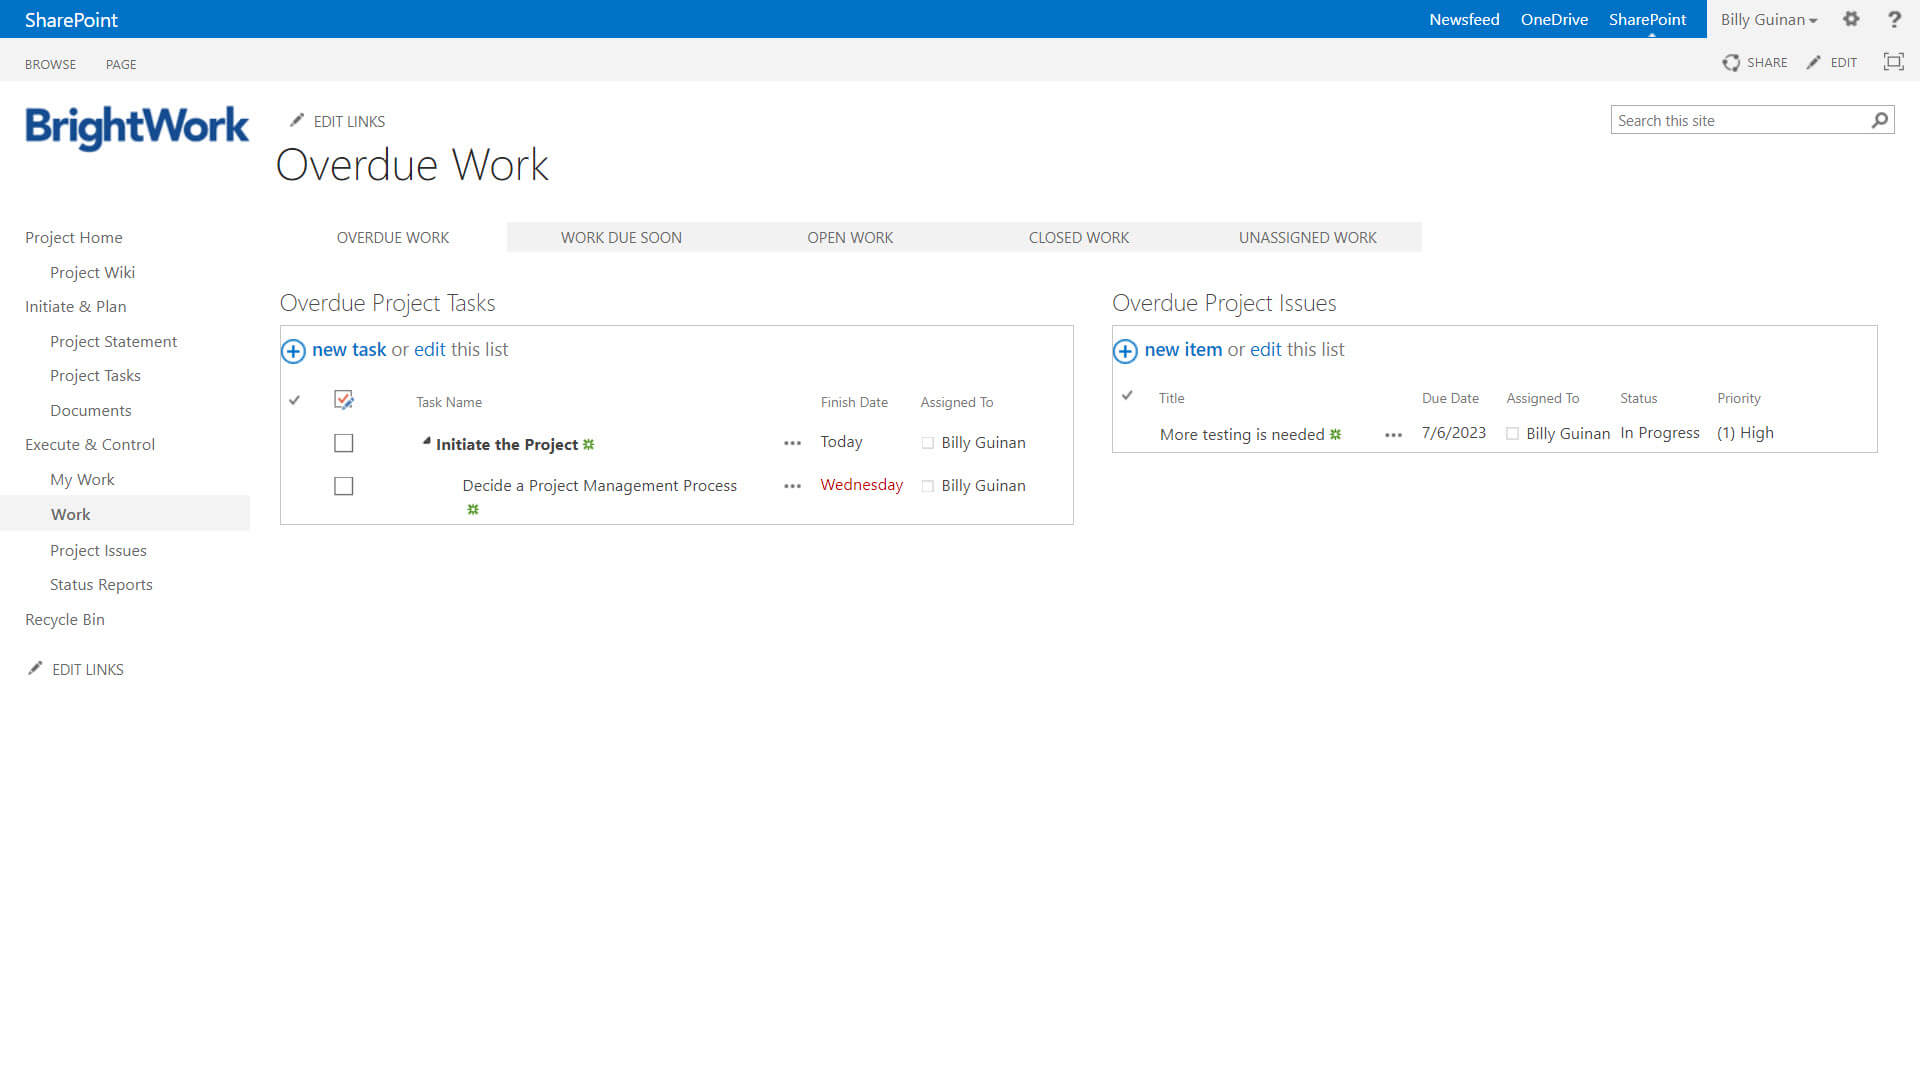
The Work report is very similar to the ‘My Work’ report except it displays all work across the project for the assigned project manager. This means you can easily check overdue, work due soon, open work, closed work, and unassigned work.
The interface works in the same way as above – simply click on the task you need to update and make the changes.
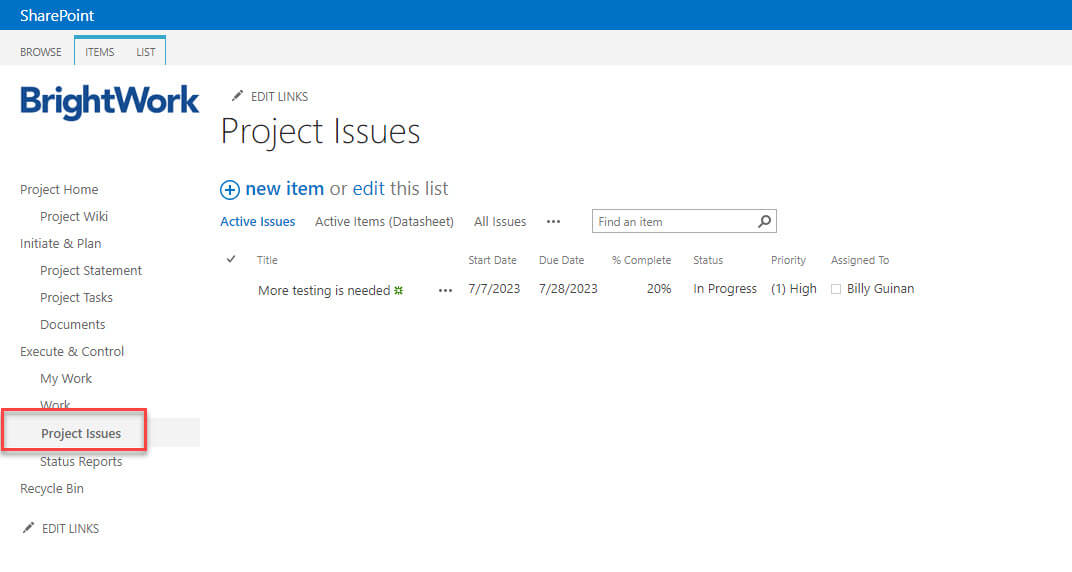
Issues Report
The Issues Report is located under ‘Execute and Control’ on the Quick Launch.
To add an issue, click ‘new item’ and complete each field on the dashboard.
The issue is now added to several reports, including:
- Top Open Issues on the project homepage
- The relevant tab in the ‘Work’ report, for example, work due soon
- The ‘Project Status’ report, accessible from the project homepage.
Project Homepage
The website project – like most projects – will move quickly once work begins! The team is likely assigned to a few projects so you need a simple way to help them get focused when working on their tasks.
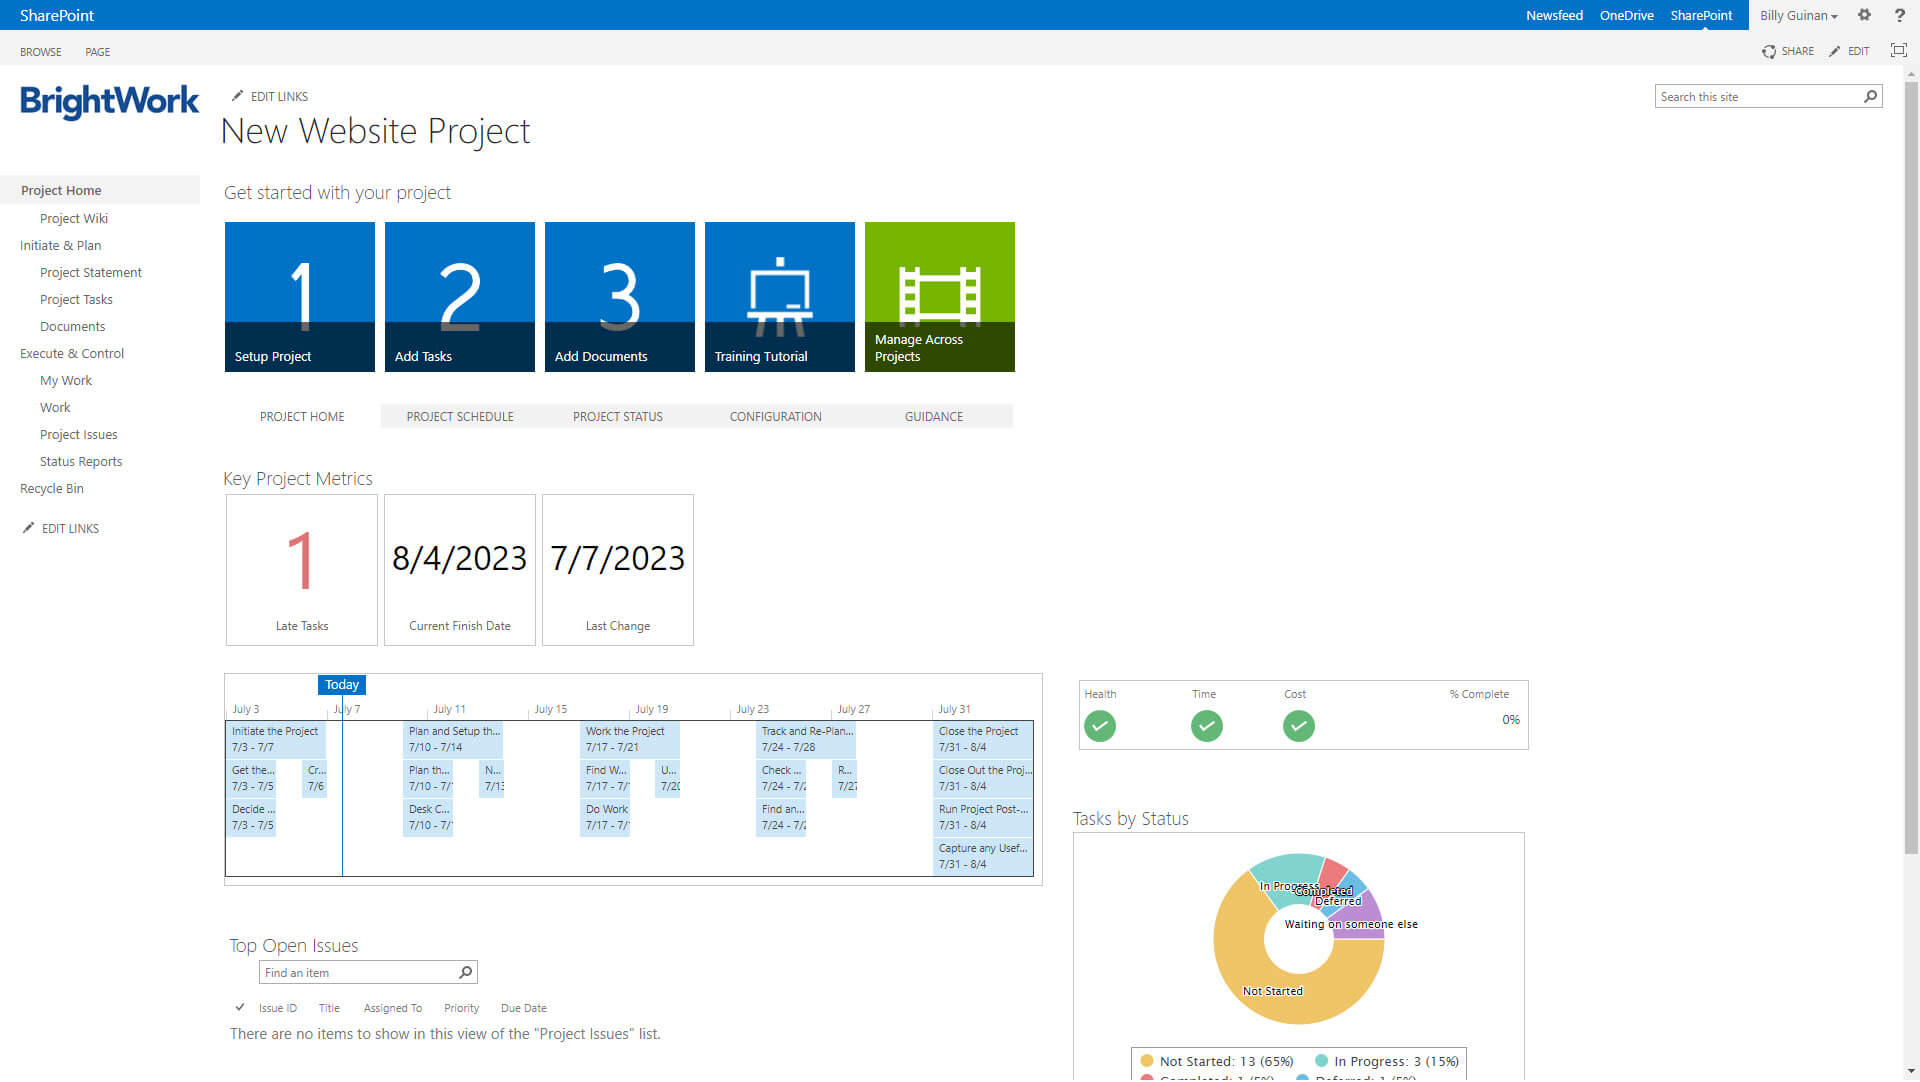
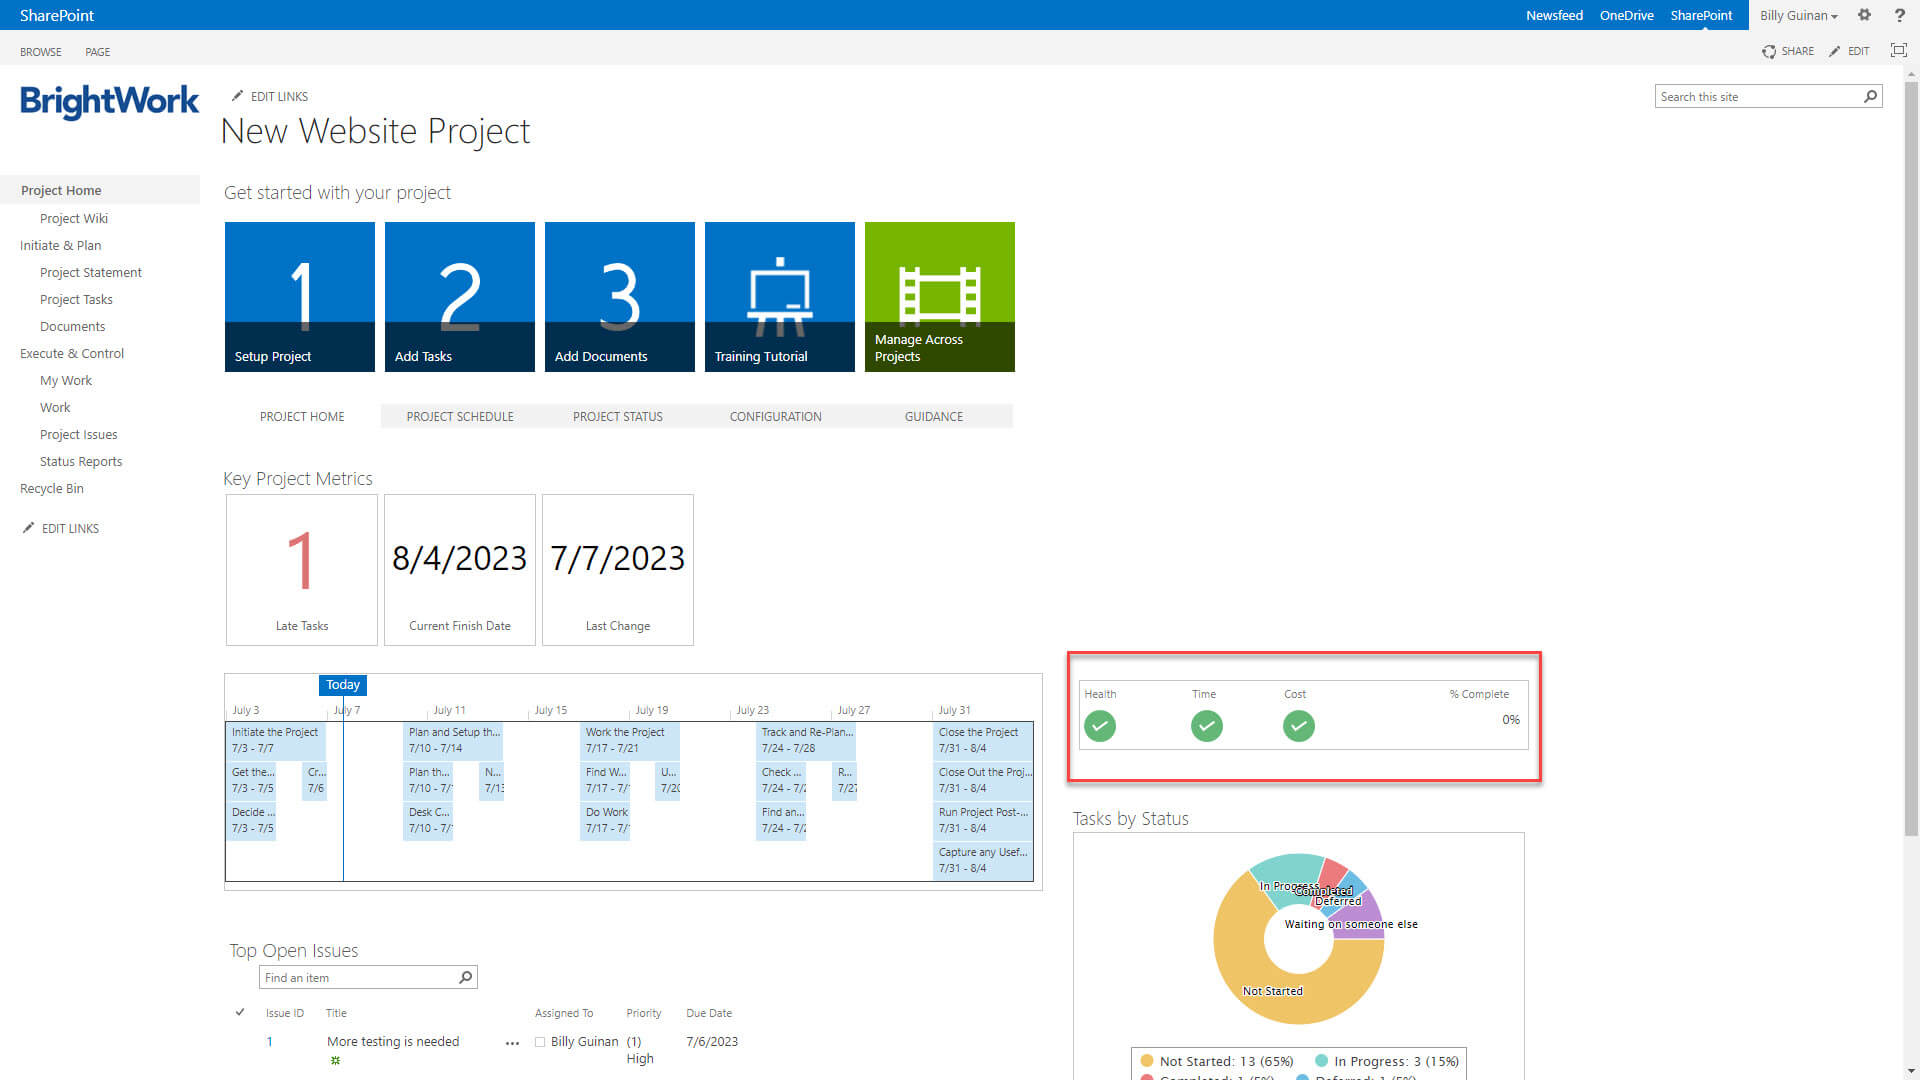
The project homepage, which summarizes key updates and data from the reports on the site, is particularly useful. The project homepage surfaces key information such as:
- Status of the project, with details on project health and % complete.
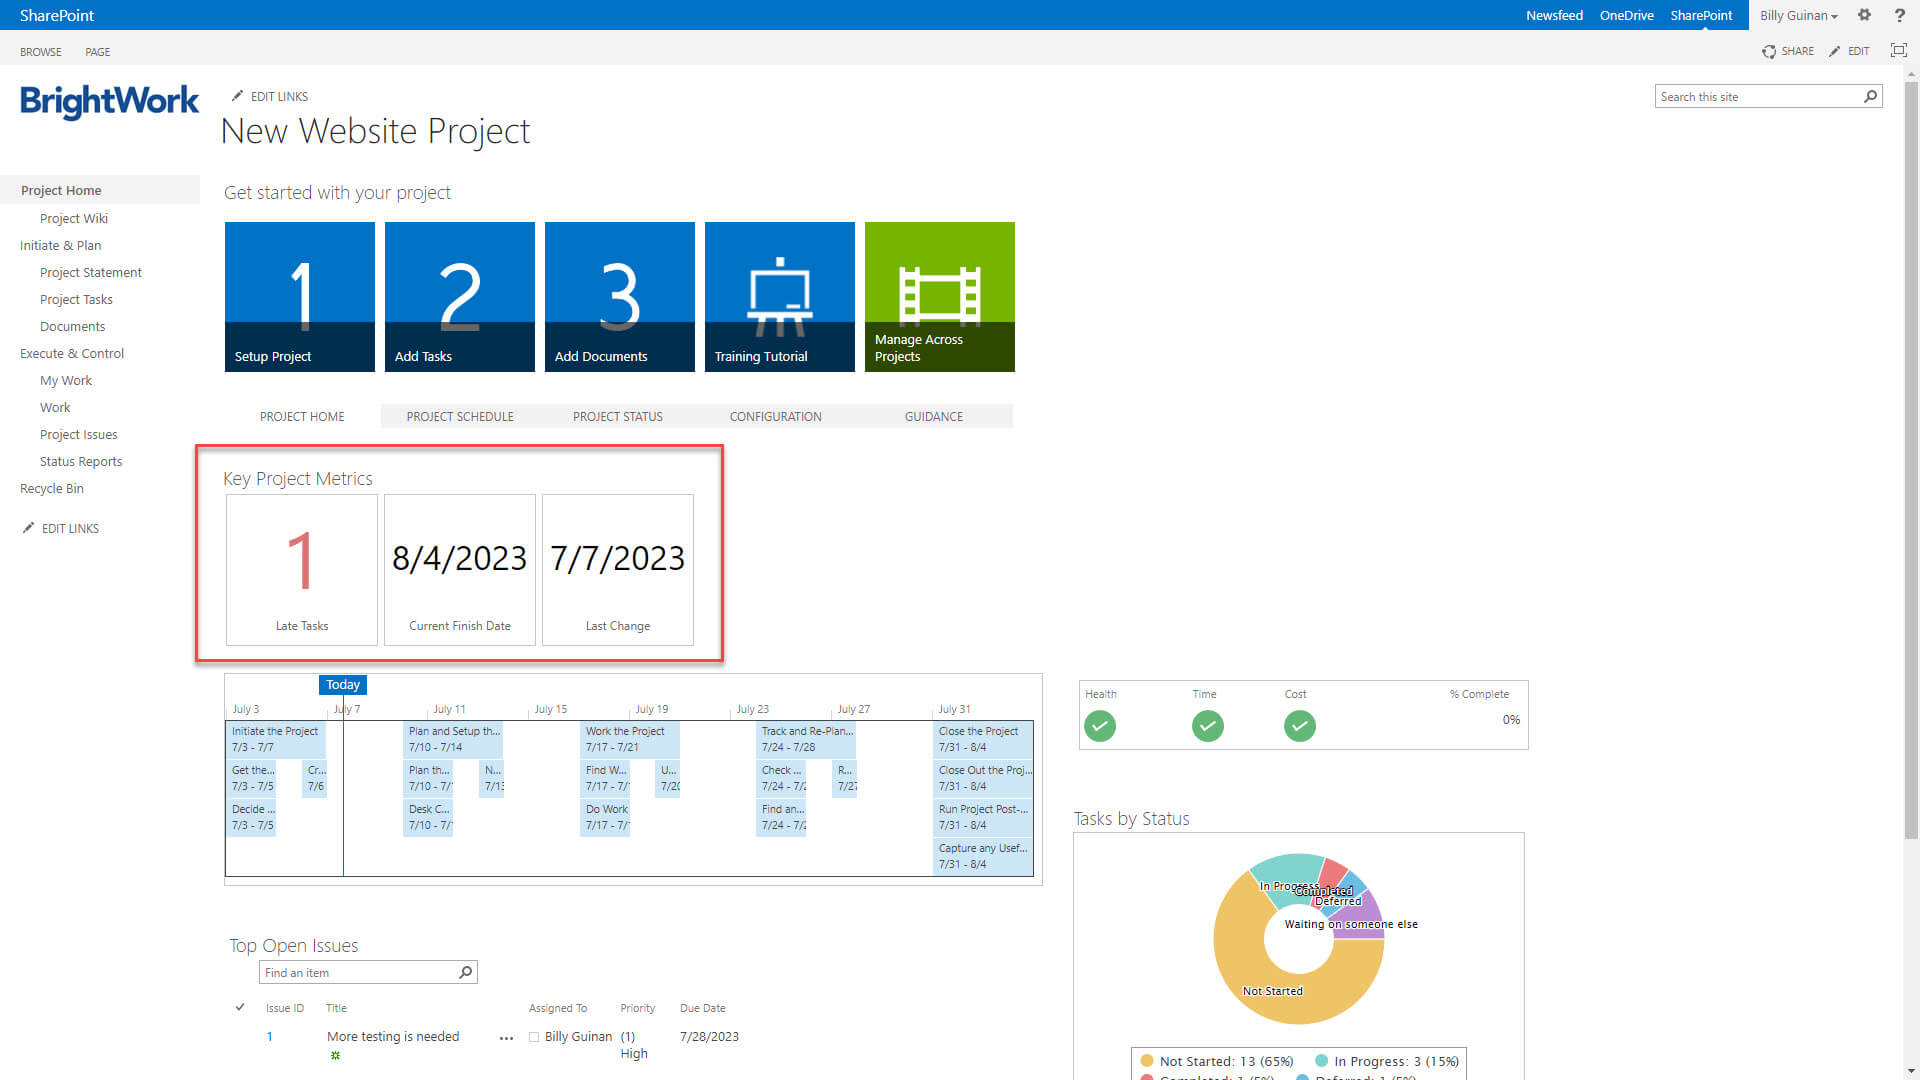
- Metric Tiles, which displays the number of late tasks, estimated finish date, and the date of the most recent update to the site.
- Overdue Items, including due date and task owner.
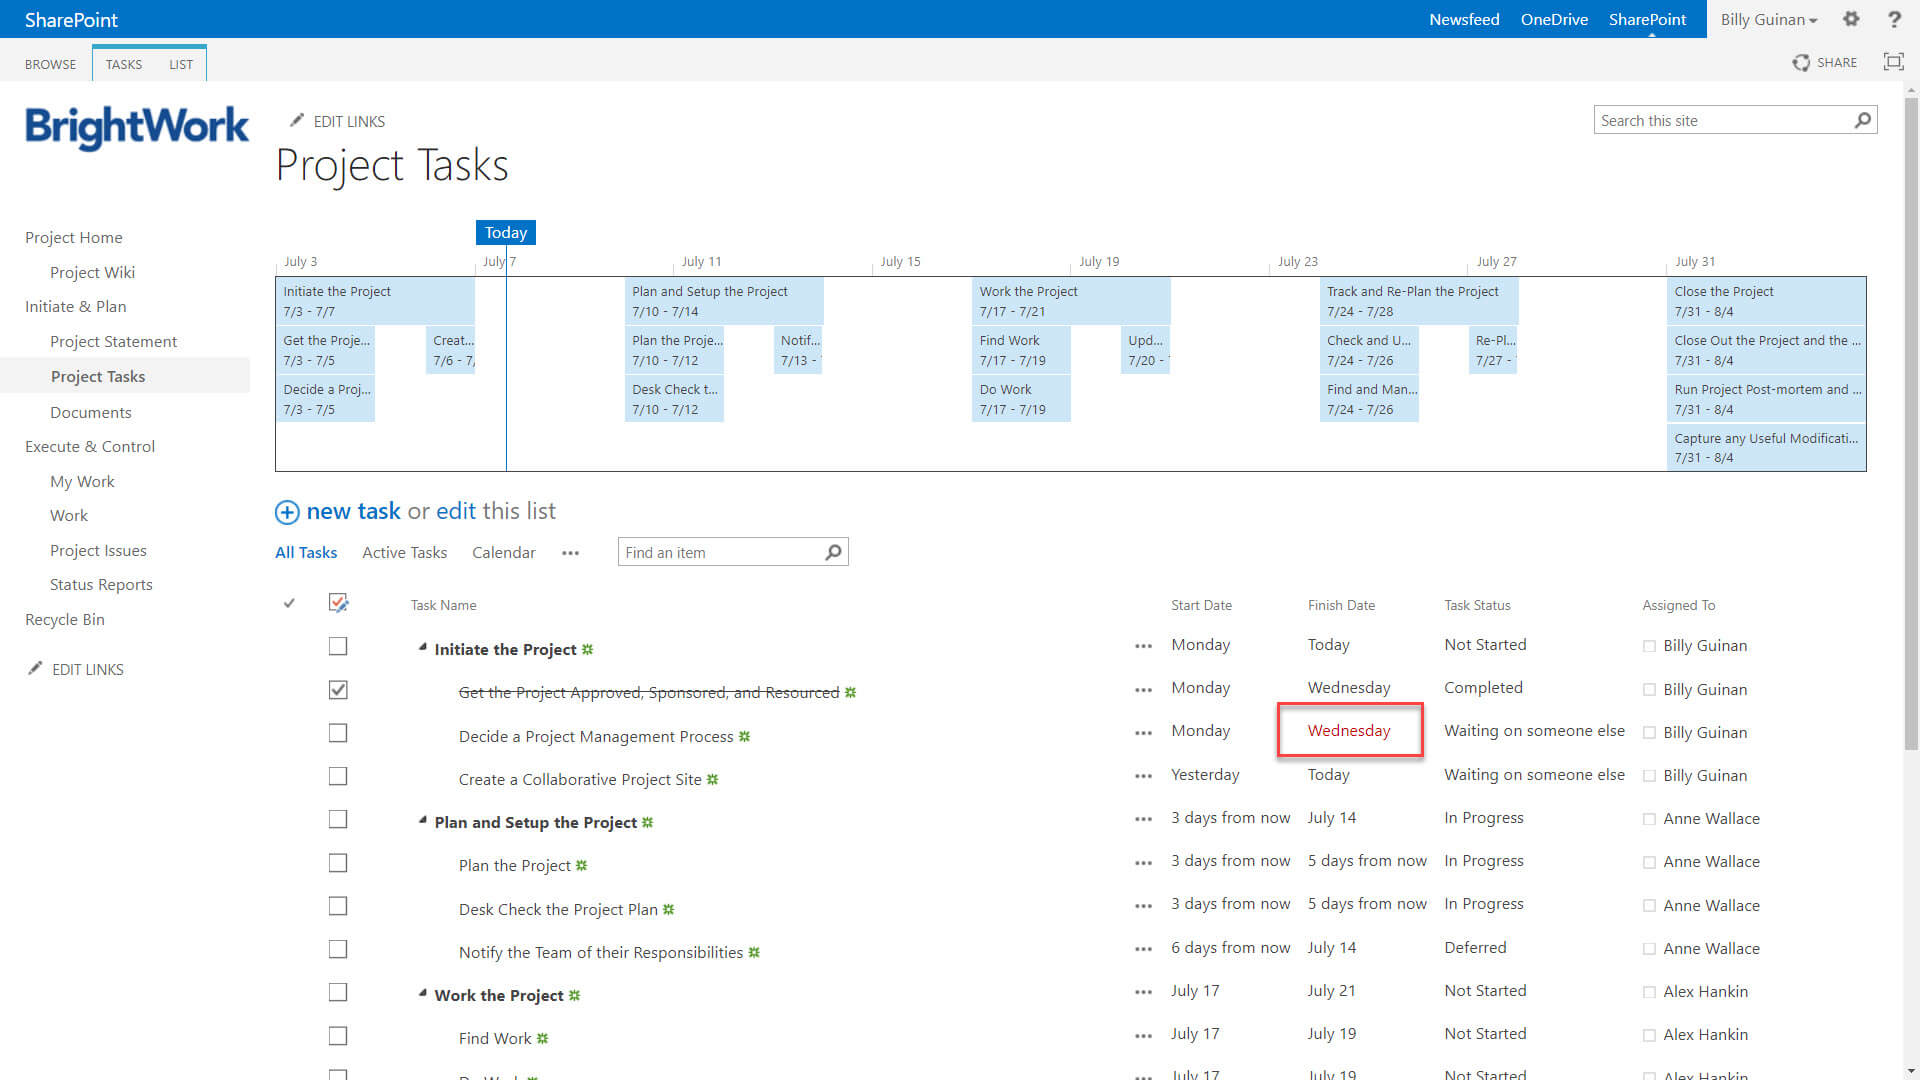
To drill down for more information, for example, to view which tasks are late, simply click on the relevant tile.
This will open the task list. The late items are highlighted in red below. You can also see the task owner and the status such as ‘waiting on someone else’ or not started.
Step 4: Track and Re-Plan Your Project
No project ever goes to plan! To get the project back on track, you should assess the status of the work before re-planning the work.
A. Check and Understand the Project’s Progress
Use the reports in the SharePoint project site to check the current status of the project. If further clarification is needed, meet with the relevant person directly.
The free SharePoint Template is pre-populated with a range of visual, intuitive project reports for ‘at-a-glance’ information. If everyone is updating their tasks weekly, the information should be correct.
Let’s start with the project homepage. Key project metrics (highlighted below) surface late tasks, the current finish date, and the date of the most recent update to the project site.
As explained above, simply click on the tile to view the underlying information.
Next, use the Work report to identify problem areas, like overdue or unassigned tasks.
In this example, an issue has been added more testing is needed on the website.
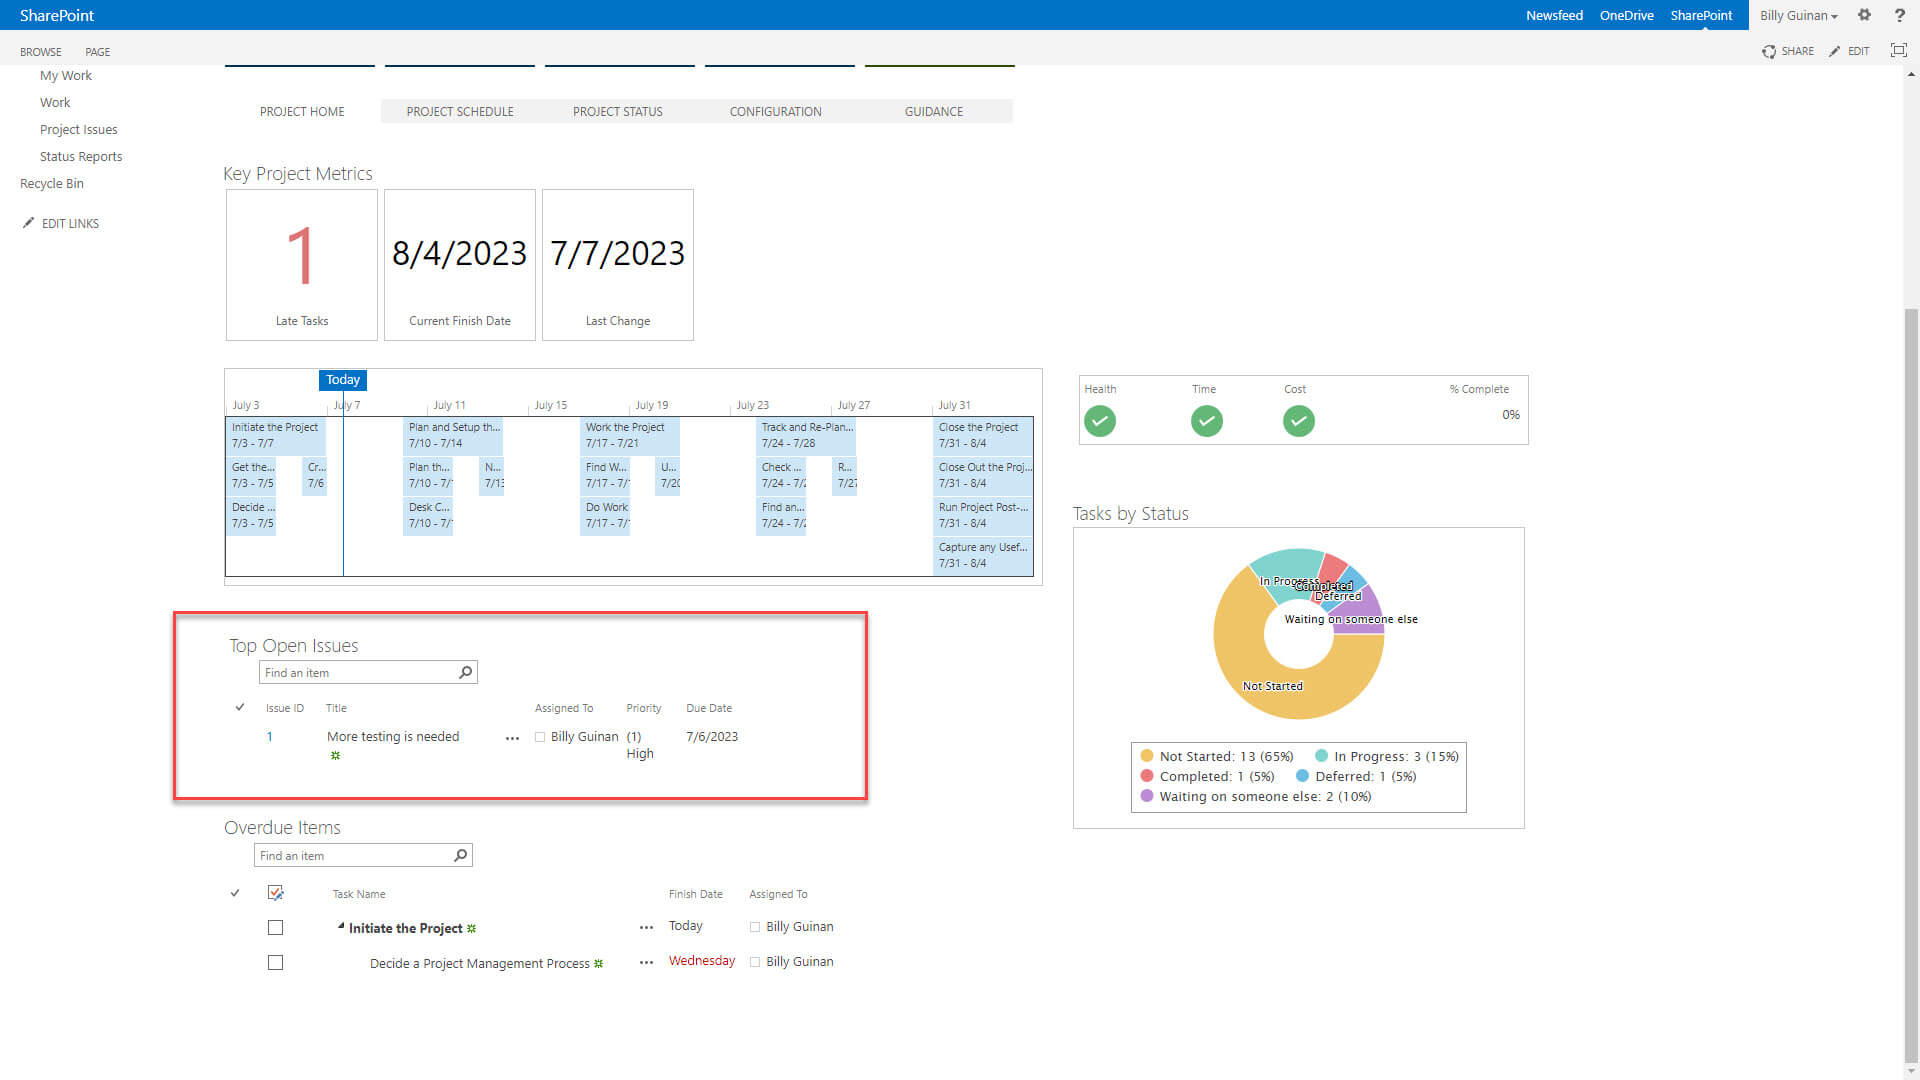
Another way to check issues is the ‘Top Open Issues’ report on the project homepage. This report surfaces all issues on the project.
The Red-Yellow-Green status indicators provide at-a-glance insights into the status of the project in terms of Time, Health, or Cost, and percent complete.
You can also find issues by clicking ‘Project Issues’ in the Quick Launch menu.
You can change the view to show:
- Active Issues
- All Issues
- By Assigned To
- My Issues.
Having gathered this data and spoken with the team where needed, you can now re-plan the project.
B. Re-plan the Project
Start by updating tasks using the bulk editor.
Once the tasks are updated, a new timeline is generated. It’s important to compare the revised projection against the original plan and share with the sponsor.
If the date is too late, you’ll need to work on a revised plan, such as dropping some requirements or adding extra resources.
If you do change or re-assign project tasks, make sure you inform the relevant team member!
The next step for re-planning the project is to add a project status report, which takes around three minutes to complete.
A typical Project Status Report includes red-amber-green indicators and captures other information such as details on project issues and items of note. The report adds more context to your project and will help you to track trends over time.
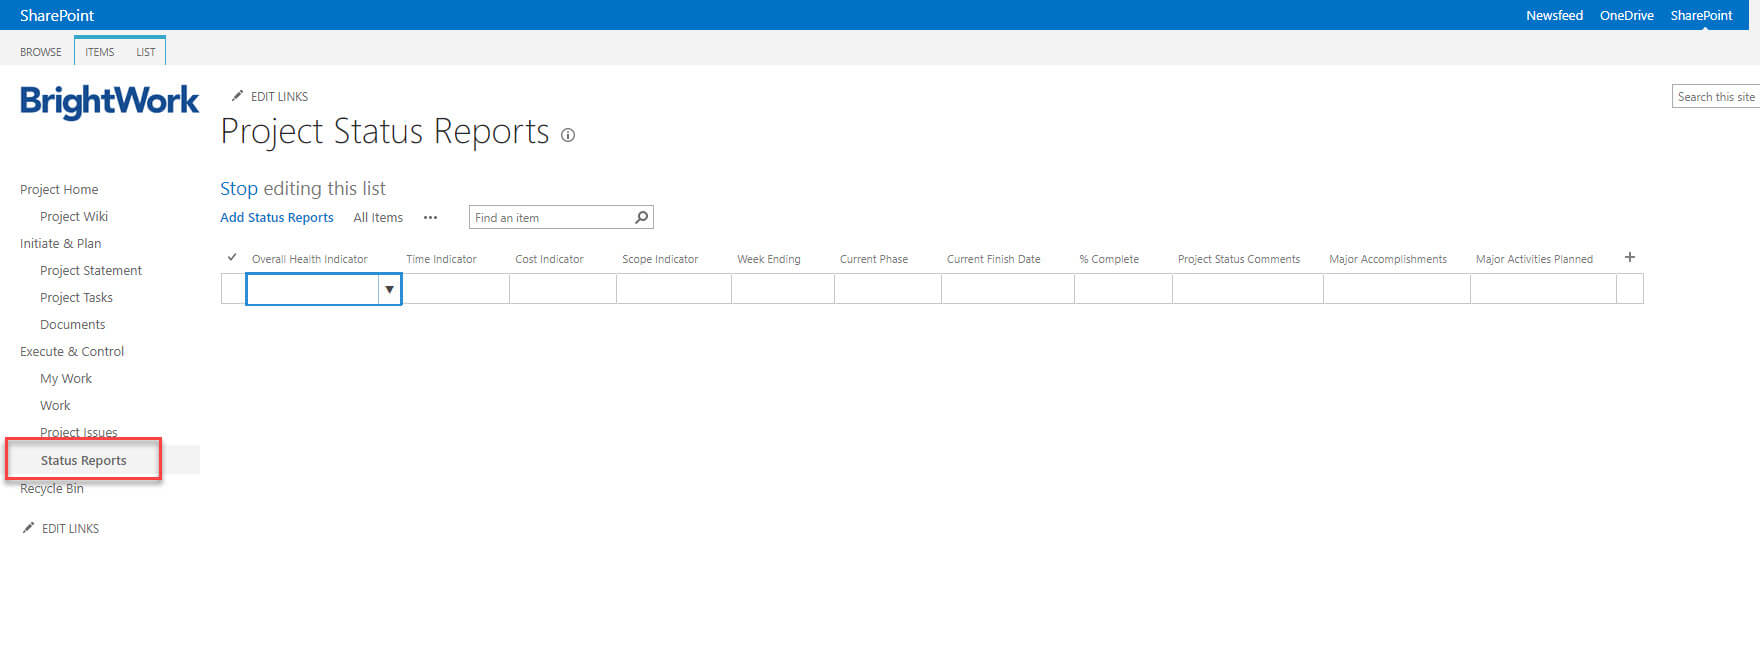
The ‘Project Status’ report is located under the ‘Execute and Control’ section of the Quick Launch.
This section also links to previous status reports.
Simply add a new item or click “Edit this list” to add a new status report.
Using the datasheet view, work through each column:
- Overall health, time, cost – color status
- Date of report
- Current project phase
- Expected finish date
- % complete
- Status comment
- Activities planned.
The new information will display on the various reports on the project homepage. Let the team and stakeholders know the project plan and site are updated so they can review the latest timeline.
Step 5: Close a Project
After months of hard work and extensive pre-launch testing, the new website is live! Close the project by updating the project site and running a retrospective with the team to document ‘Lessons Learned’.
A. Close Out the Project Site
Firstly, review all tasks to make sure nothing has been overlooked.
Once this review is finished, mark all tasks as complete using the bulk edit function as explained above. Likewise, you can use the bulk editing functionality to mark all issues as resolved.
Next, add a final project status report to the site to capture some thoughts about the project overall.
Finally, review and update project documentation as needed.
B. Document Lessons Learned
The more you learn from the project you have just completed, the more successful you will be with the project you are about to start.
It is also important to remember as a project manager, you were the leader of the project, but not the sole owner of its processes and tasks.
The simplest way to run a project post-mortem is a team meeting. Use the meeting to answer three questions:
- What went well?
- What didn’t go so well?
- What should we do to improve our next project?
Here are a few tips to help you frame the discussion and answer these questions.
- Start with a recap of the project’s goals and objectives.
- Compare the desired results with the final deliverables. Did you achieve your goals? Is the client or stakeholder satisfied with the project outcome?
- Review each stage of the project in terms of successes, mistakes, outputs, and learnings.
- Look at how the team worked together. Did everyone follow the agreed procedures? Was the project site easy to use and update? Was the project plan useful to the team? Did the team communicate and collaborate together?
Review the feedback and suggestions to find actionable inputs to your next project. For example, if unassigned tasks were a roadblock, you can use the ‘Work’ reports more frequently on future projects.
Finally, share these insights with the wider organization to help evolve project management practices across all teams.
Below is a recap of the five-stages of collaborative project management and the supporting tools in the free SharePoint project management template.

Download a Free SharePoint Template
40,000 organizations use BrightWork to manage their projects and portfolios on SharePoint On-Premises (2019, 2016).
What are SharePoint Team Sites in Microsoft 365?
Up to this point, this guide has covered project management templates for SharePoint Server Subscription Edition, SharePoint 2019, and SharePoint 2016. SharePoint Online in Microsoft 365 is a different platform, but it can also be used for project management.
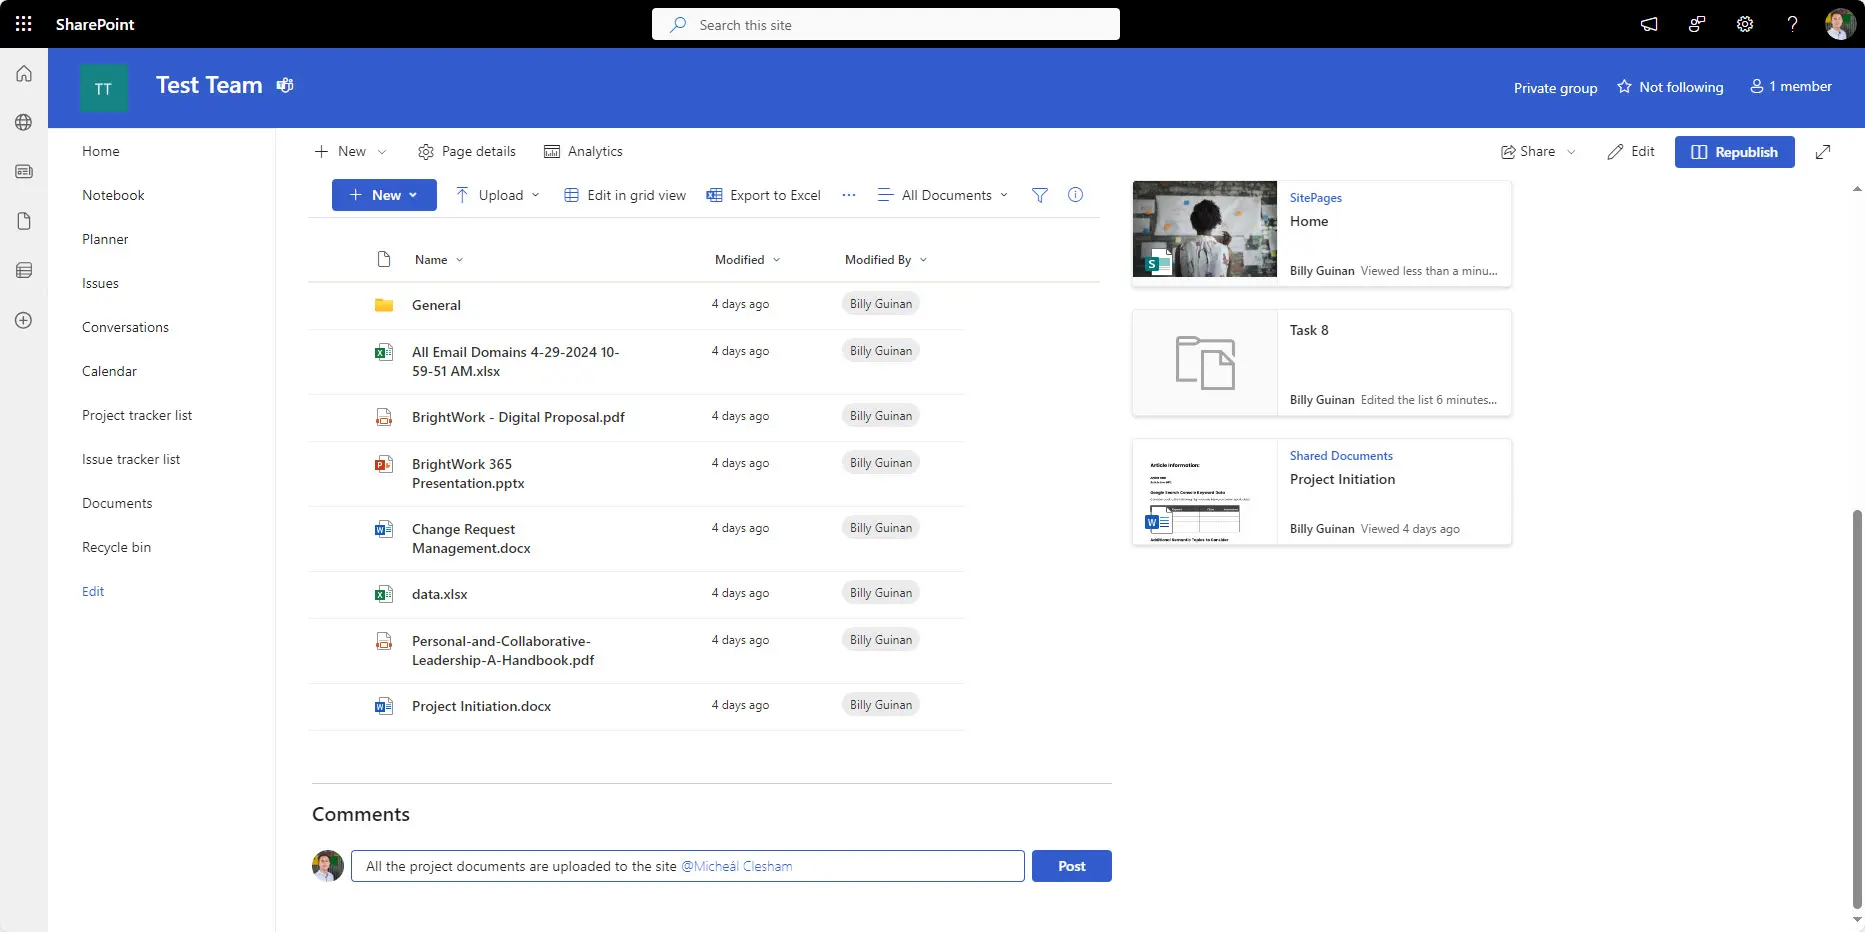
A SharePoint team site is a collaborative workspace within Microsoft’s SharePoint platform that is designed to help teams work together effectively. It acts as a central hub for project collaboration, document storage, and communication among project members.
A SharePoint Project Management site in Microsoft 365 is a specialized site designed to help teams plan, track, and manage projects within an organization. This site integrates with other Microsoft 365 tools like Teams, Planner, and Outlook, providing a centralized space for project-related activities. Similar concept as on-prem – different platform.
Key Features of a SharePoint Project Management Site in SharePoint in Microsoft 365
When it comes to project management, a SharePoint team site can be an invaluable tool, providing a centralized platform to manage all aspects of a project. Let’s take a look at the elements of this template and explore how you can configure it to manage projects the way you want to.
Project Documentation and Resources
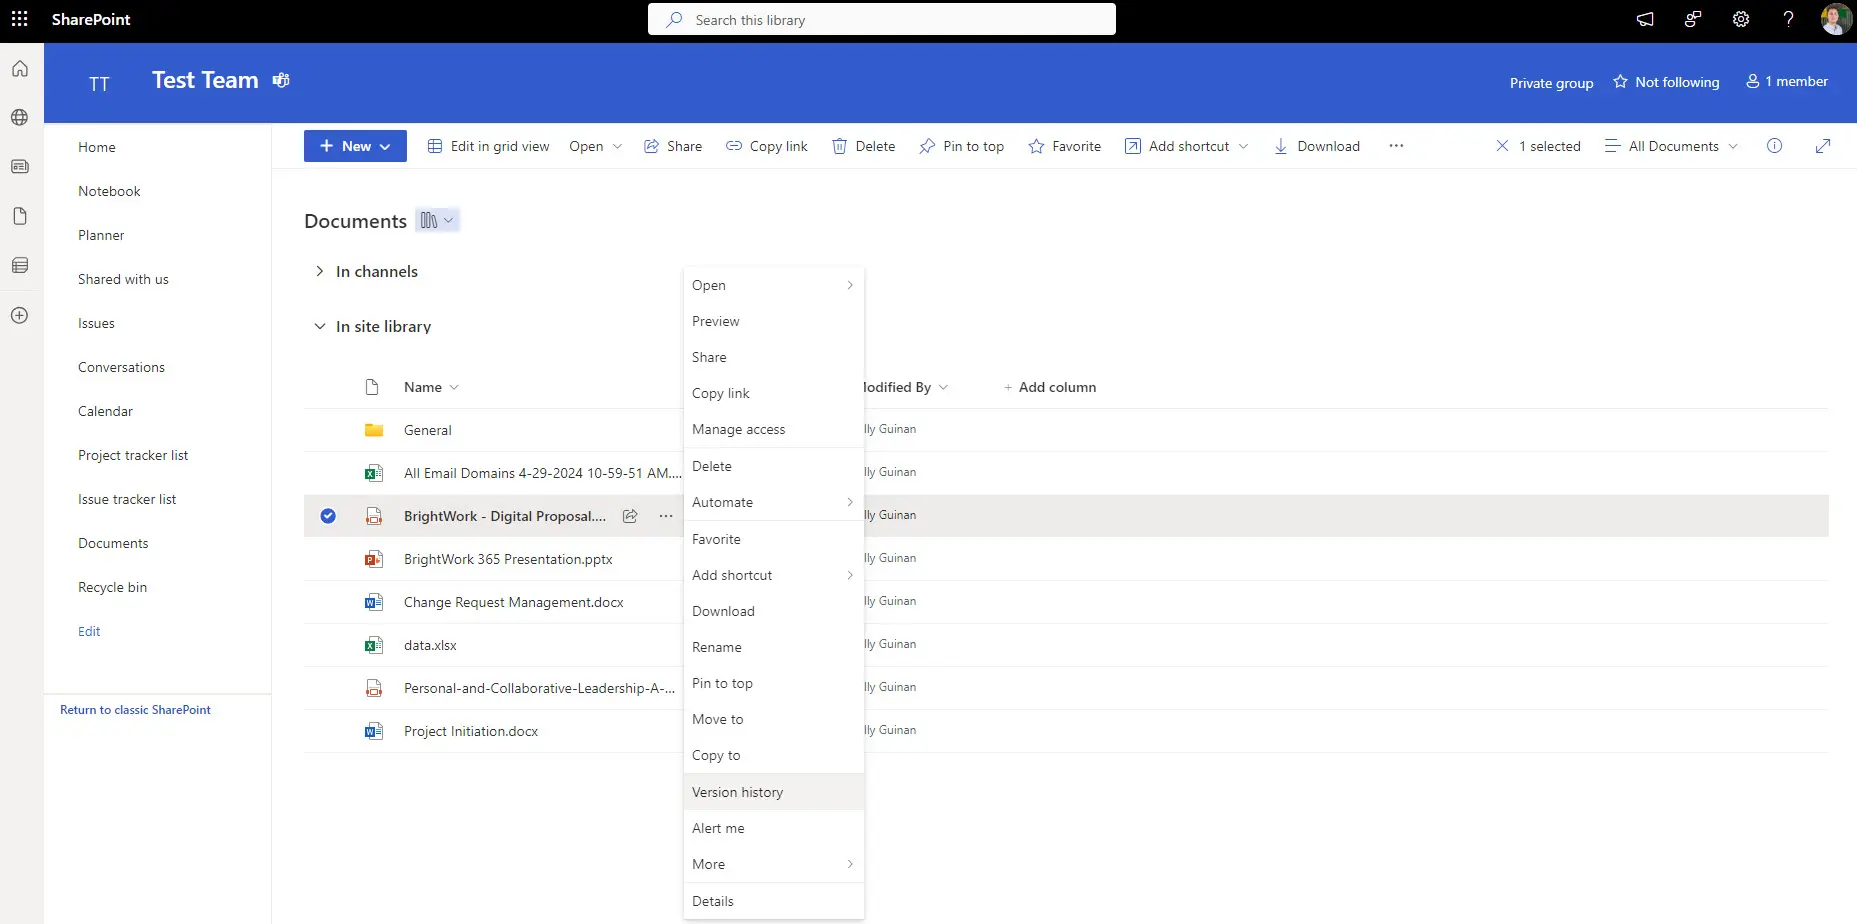
With Document Libraries you’ll get the ability to store and manage all project-related documents, such as project plans, schedules, reports, and deliverables. You will have the added benefit of Version Control to keep track of document revisions and ensure that the team is working with the most up-to-date files.
Task and Project Tracking
You also have a few options for project tracking in SharePoint:
- SharePoint Lists
- Microsoft Planner integration
You can add a SharePoint List to create and manage tasks, assign them to team members, and track their progress. These lists can also be used for other project processes like issue tracking.
One other benefit of managing your projects within the Microsoft 365 stack is the integration with other Microsoft tool, like Microsoft Planner. By adding a Planner to your SharePoint Online site, you visualize tasks using Kanban boards, assign tasks, set due dates, and track completion.
Communication and Collaboration
SharePoint facilitates seamless communication and collaboration with features like real-time document editing, discussion boards, and integration with Microsoft Teams.
Discussion Boards and News Feeds facilitate team communication by providing spaces for discussions, announcements, and updates.
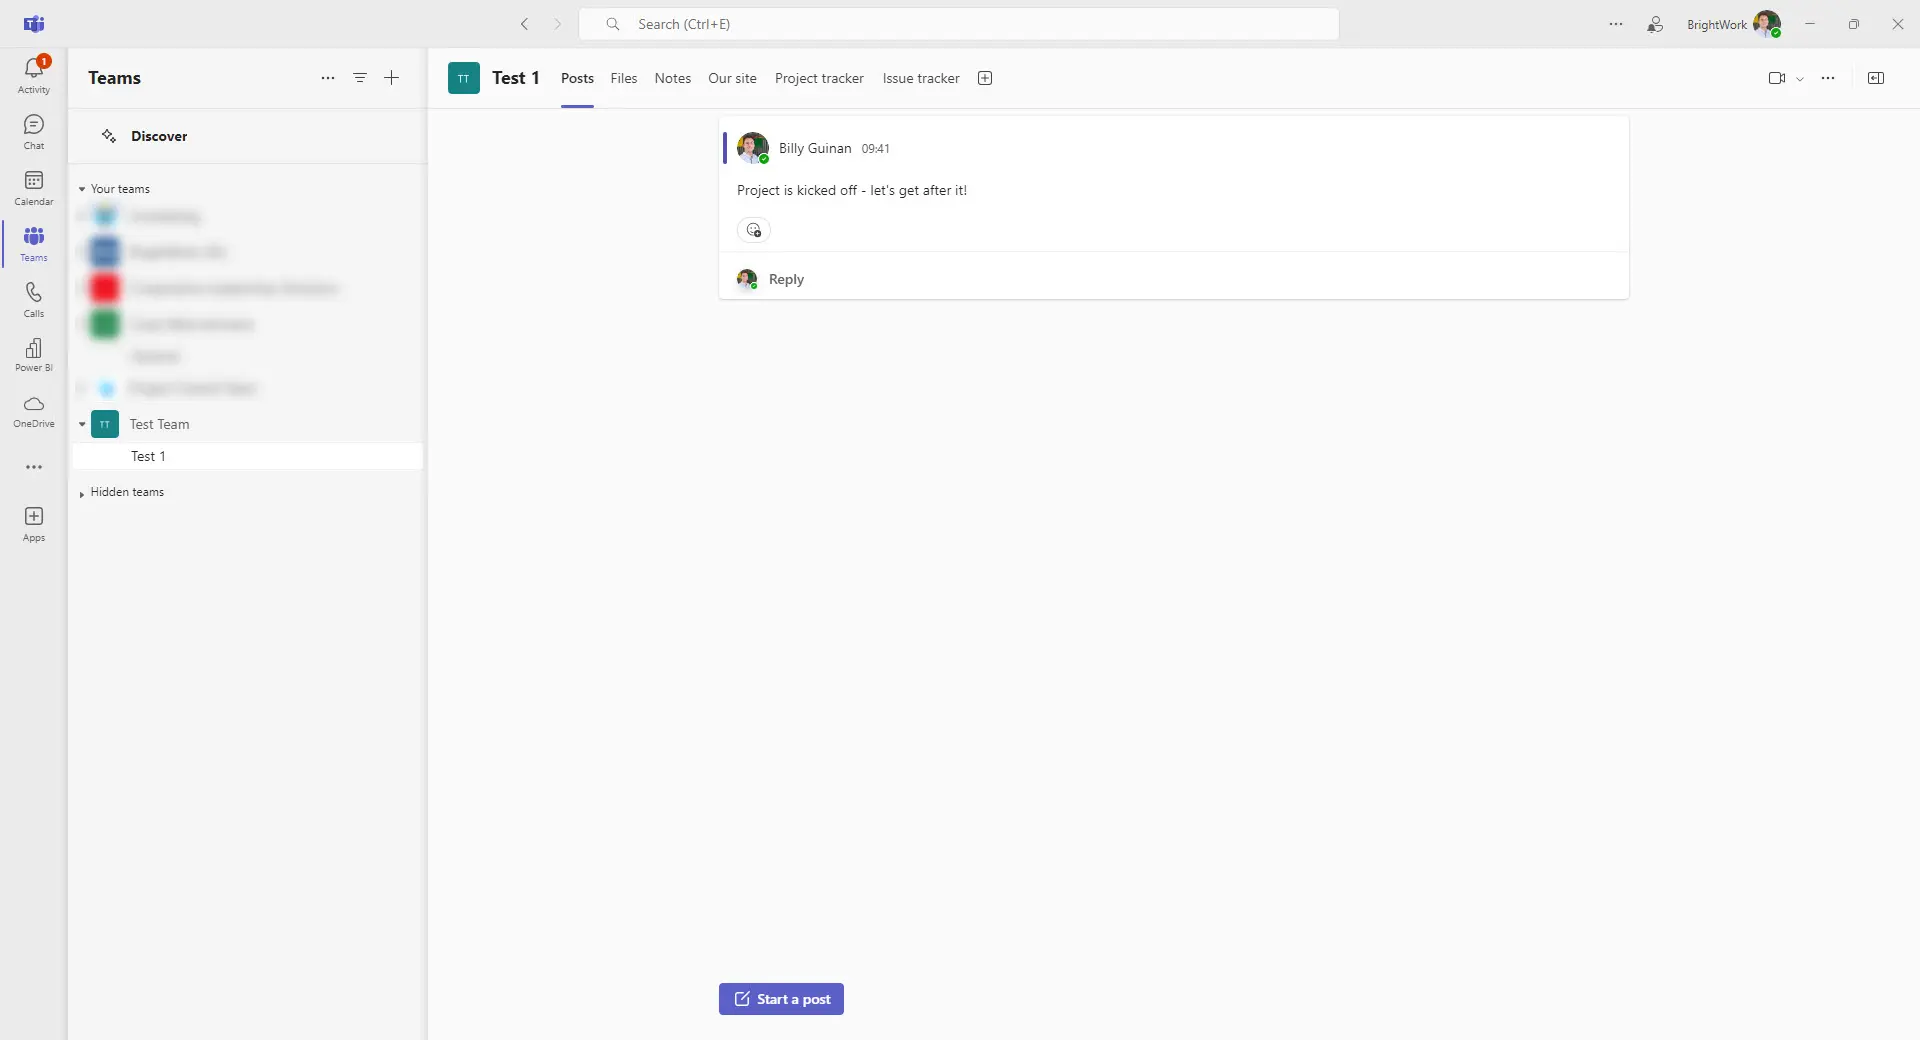
Collaborate in real-time through chat, video conferencing, and shared resources by setting up a Teams Channel for your project.
SharePoint has a tight integration with the rest of the Microsoft 365 (like Word, PowerPoint, and Excel), so document sharing and co-authoring is extremely when working on project deliverables.
Project Reporting
There are a couple of ways to report on your project in SharePoint Online.
You can use customizable web parts to display key project metrics, such as task completion rates, budget status, and upcoming milestones.
If you need more in-depth or interactive reports for senior executives, for example, then you can leverage Power BI reports to analyze project data and generate visual insights.
Access and Permissions
SharePoint Online includes robust security features to protect sensitive information. It supports multi-factor authentication, access control, and compliance with industry standards such as GDPR and HIPAA
With role-based access, you can define who can view, edit, or manage specific content based on their role in the project.
Automation and Workflows
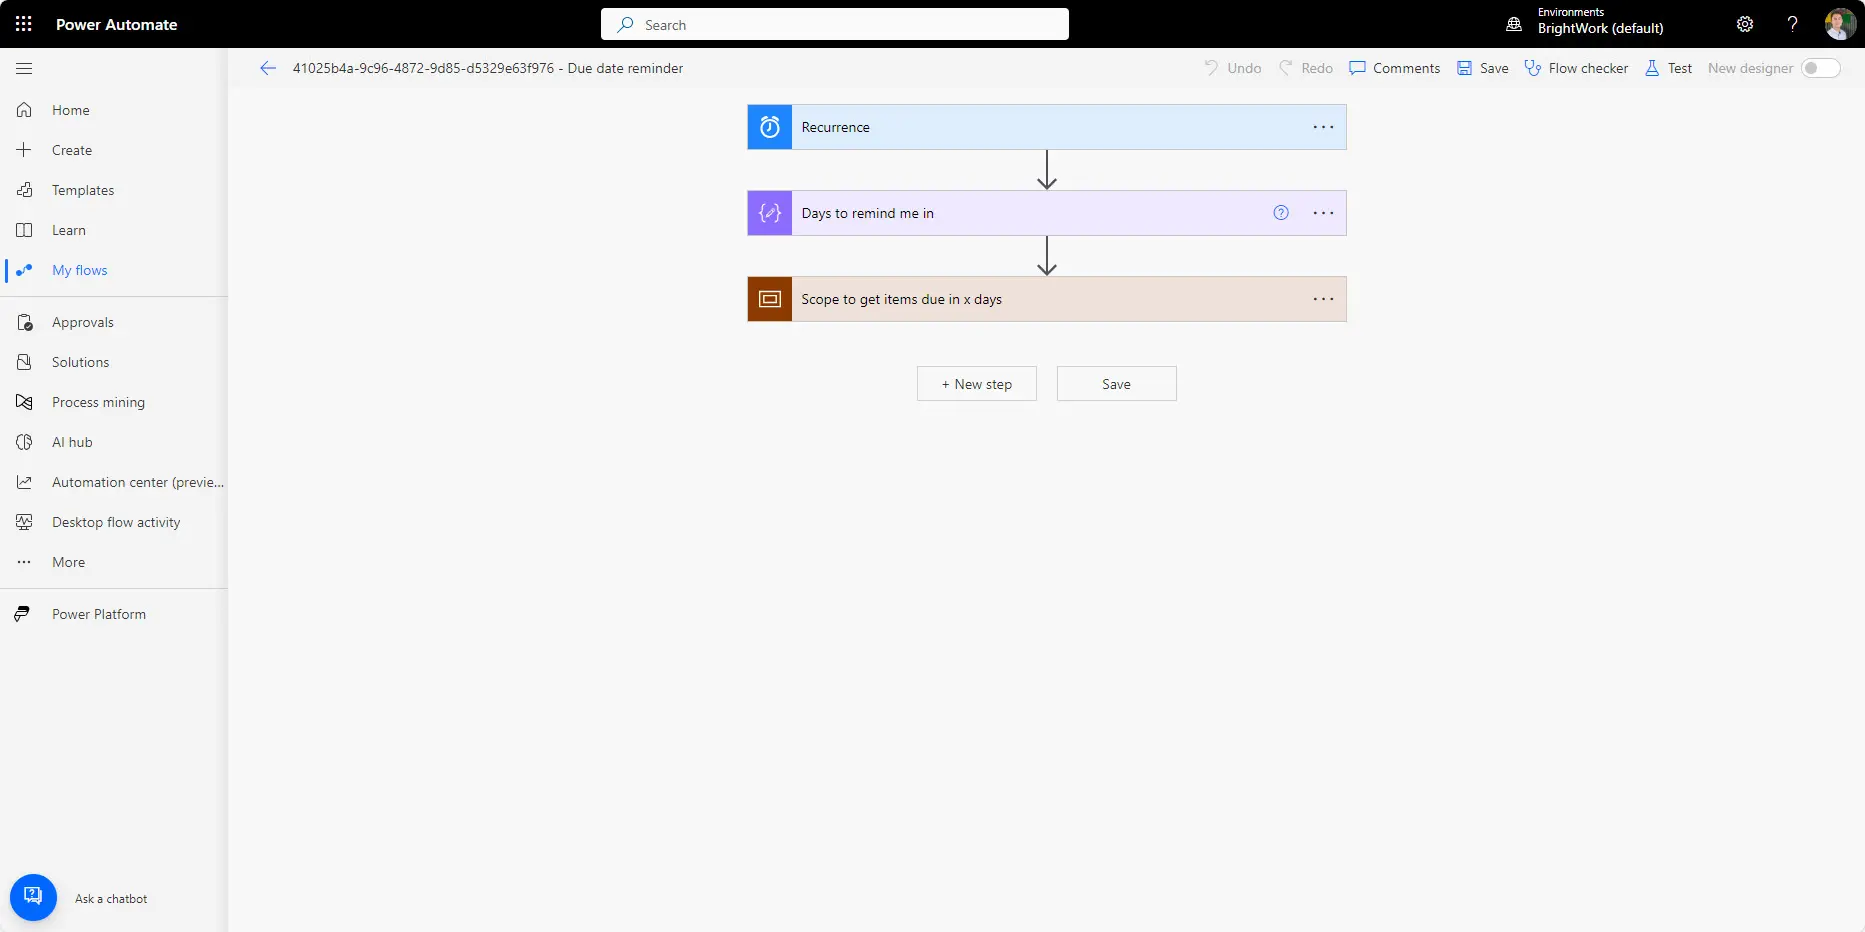
Automate repetitive tasks and processes, such as approvals, notifications, and task assignments with Power Automate. For example, you can use Power Automate to setup a reminder on your Tasks List when a task “is due in three days.”
You can also use SharePoint’s built-in workflows to automate common project management activities.
Project Templates
One of the biggest benefits of SharePoint (and part of the BrightWork ethos for project management on SharePoint) is the idea of reusable templates. Well, in SharePoint Online you can also set up project management site templates with pre-configured lists, libraries, and web parts to ensure consistency across projects.
Project Management in SharePoint Online in Classic Mode
Note that, the free SharePoint project management template from BrightWork can be used in Classic Mode in SharePoint Online in Microsoft 365 (but we would recommend looking at a tool like BrightWork 365 if you are looking to manage projects in your Microsoft 365 cloud).
BrightWork 365: Project and Portfolio Management Solution for Microsoft 365 and the Power Platform
It’s worth noting that SharePoint has evolved, and there are newer versions available beyond SharePoint 2019 and SharePoint 2016, such as SharePoint Online in Microsoft 365.
In addition to SharePoint Online, Microsoft 365 includes additional features, apps, and improvements that can all be leveraged for their project management capabilities.
If your organization is moving away from on-premise SharePoint but would still like to manage your projects within the Microsoft ecosystem, then Microsoft 365 is a good place to start.
You can use:
- Power Apps for project sites
- Power BI for portfolio reporting
- Power Automate to manage workflows
- SharePoint Online for document management
- Microsoft Teams for collaboration
- Azure Active Directory for security and permissions.
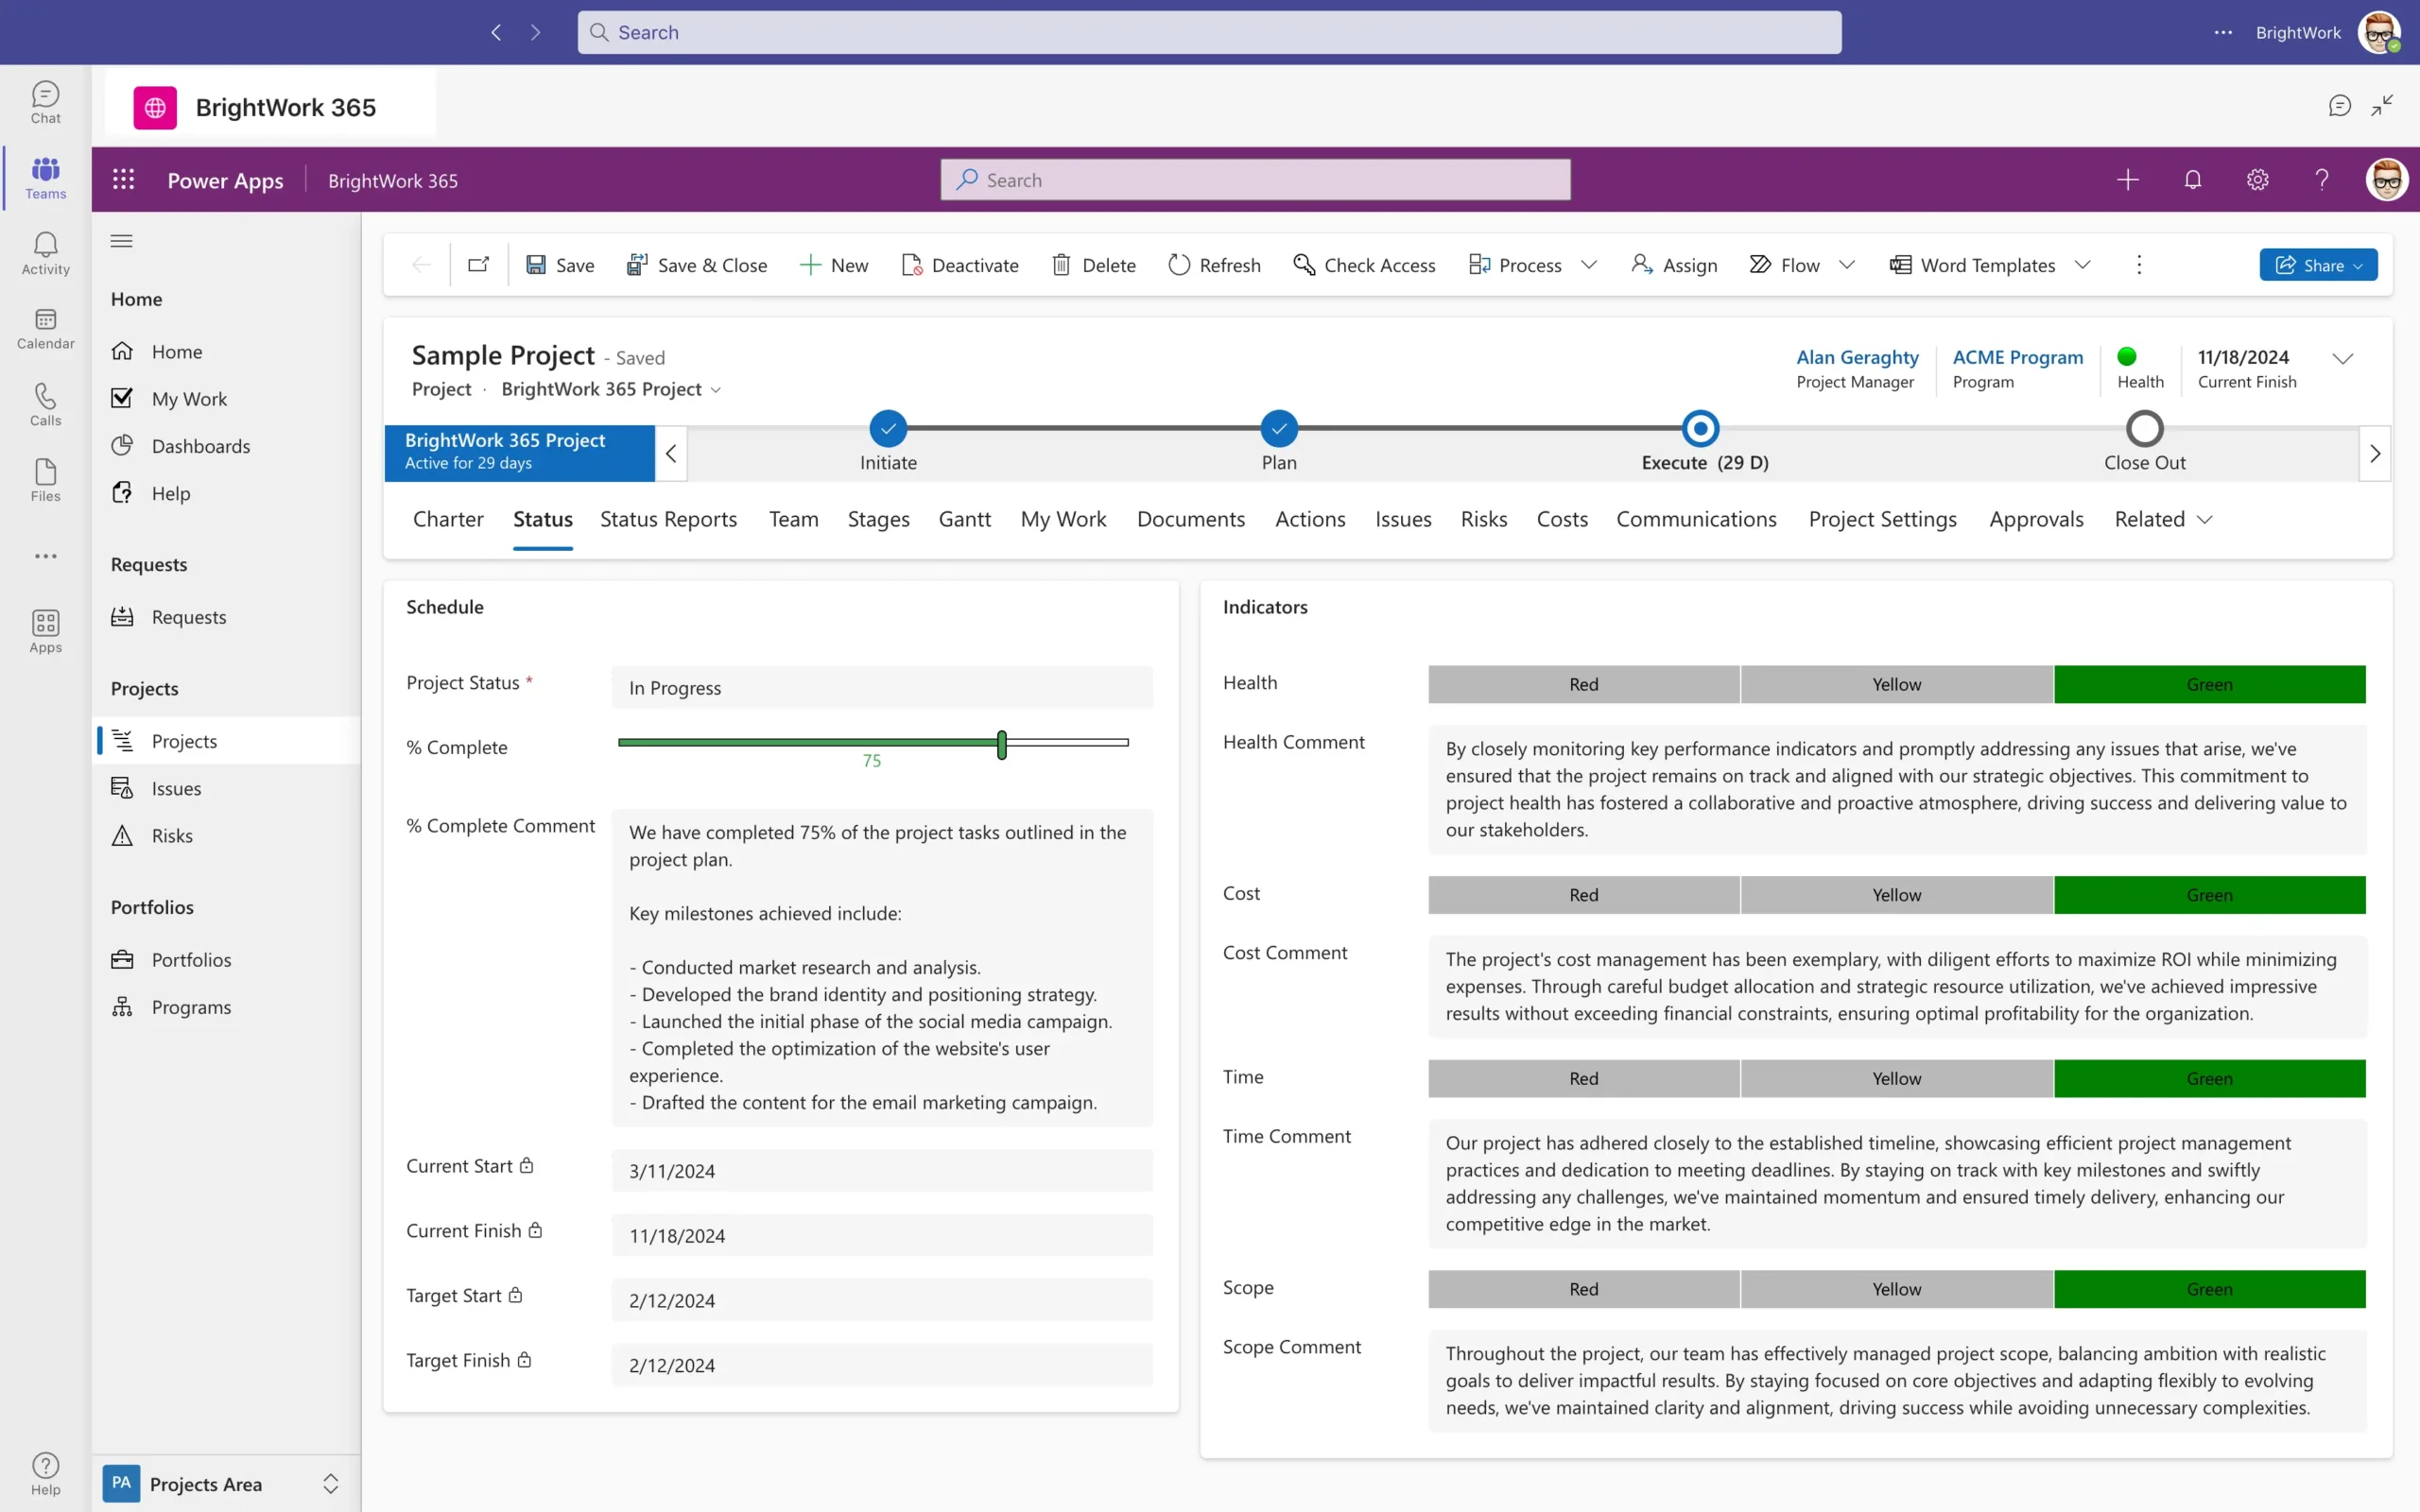
BrightWork 365 is a project and portfolio management solution built on top of Microsoft 365 and the Power Platform. It is designed to enhance and extend the project management capabilities of Microsoft 365, providing additional features and templates for managing projects, tasks, resources, and portfolios.
BrightWork 365 offers preconfigured project management templates that align with popular project management methodologies and provides a user-friendly interface, customizable dashboards, and reporting capabilities to help teams effectively plan, track, and collaborate on projects within the Microsoft 365 environment.
Manage Projects with Microsoft 365, Power Platform, and Teams
Collaborate seamlessly from anywhere, with BrightWork 365 and Microsoft Teams.

